
Next Post
Working with Carmenta Server Core and Microsoft Azure App Service
Find out how to develop OGC-compliant map services with Carmenta Server Core and deploy them on Microsoft Azure App Service using containerized workflows.
View Post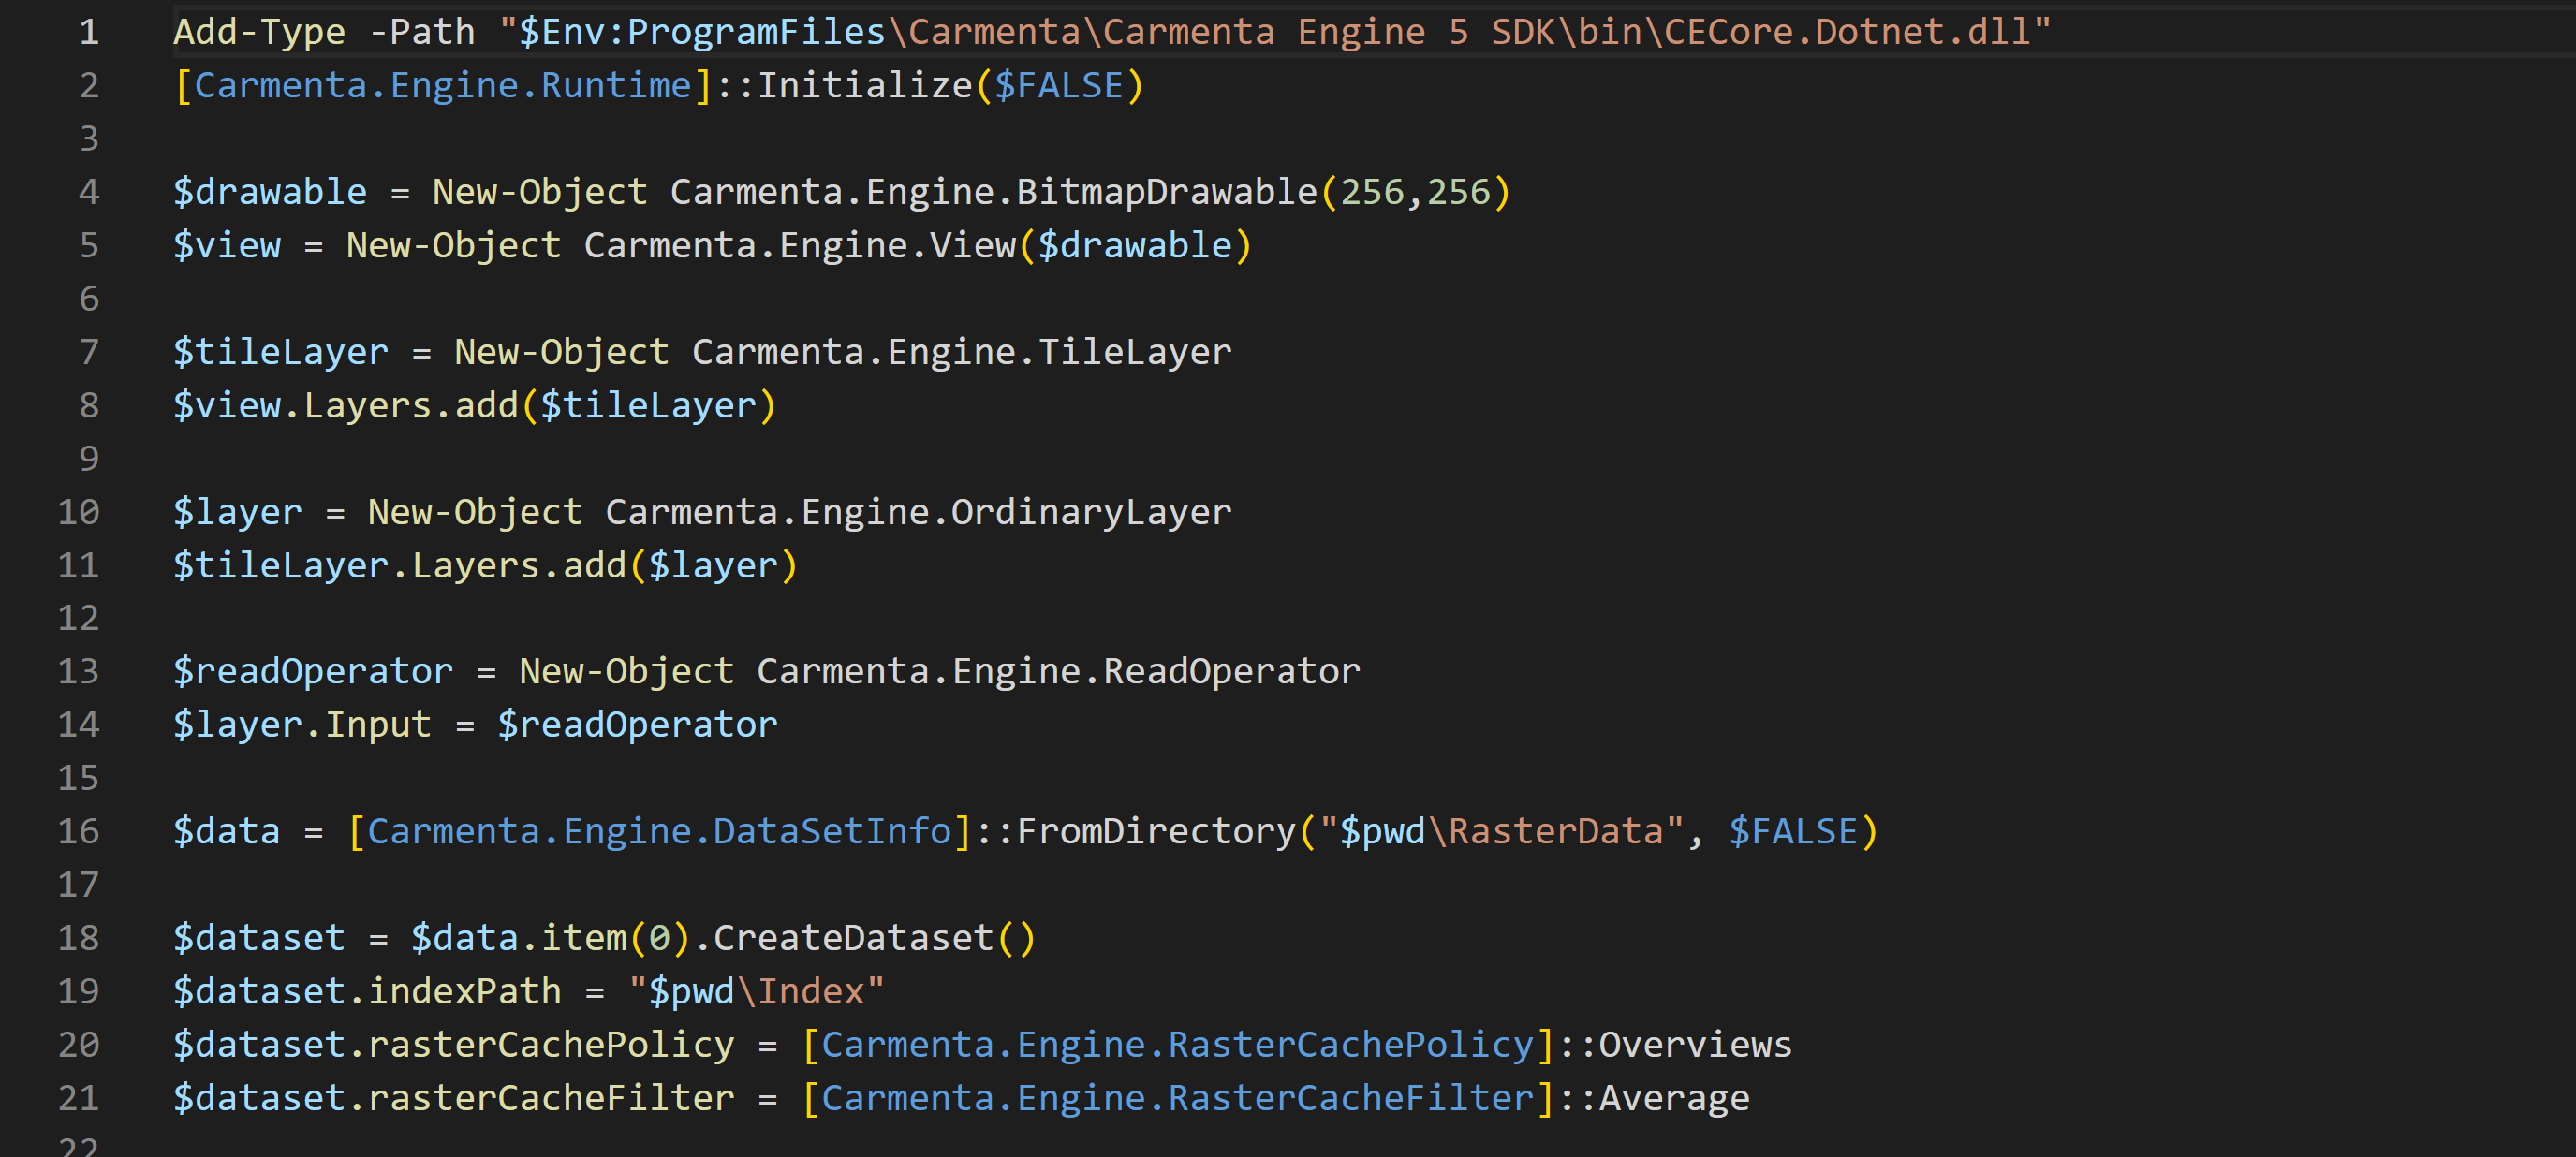
PowerShell provides a lot of built-in functionality, but it is also possible to load dll files directly and gain additional functionality. In this article we will have a look at how it is possible to use the Carmenta Engine API directly in PowerShell to automate tasks such as creating configurations for Carmenta Engine.
Using the Add-Type cmdlet lets you load a .NET library in your PowerShell session, and we will use this to load the Carmenta Engine Core into PowerShell. In the same way you can load any part of Carmenta Engine into PowerShell, depending on what functionality you want to use.
Simply use the Add-Type cmdlet and point it to the dll you want to load.
Add-Type -Path "$Env:ProgramFiles\Carmenta\Carmenta Engine 5 SDK\bin\CECore.Dotnet.dll"
After we have loaded Carmenta Engine Core into PowerShell we can use all system objects available there by using the syntax [System Object] and the static member operator :: makes it possible to use all static members directly.
To initialize Carmenta Engine add the following code to your file.
[Carmenta.Engine.Runtime]::Initialize($FALSE)
We initialize the runtime with $FALSE as parameter to disable thread verification, read more about this functionality here and learn how it’s useful when building GUI applications. If you don’t have an Carmenta Engine SDK license installed on the computer where you intend to run the PowerShell script you will have to initialize Carmenta Engine with the runtime license.
As always, you should always shut down Carmenta Engine when you are done, so while you remember that make sure that the last line in your PowerShell script shuts down the runtime.
[Carmenta.Engine.Runtime]::Shutdown()
We can now interact with Carmenta Engine as you would in any application.
The next step is to create a Carmenta Engine View, but if we look at the documentation for the View class in Carmenta Engine SDK documentation, we find that a view constructor needs a Drawable.
Because of this we need to create a Drawable before we create the View, and to create a new object in PowerShell we use the New-Object cmdlet.
The following line will create a simple BitmapDrawable.
$drawable = New-Object Carmenta.Engine.BitmapDrawable(256,256)
And now we can create a View with the Drawable.
$view = New-Object Carmenta.Engine.View($drawable)
To speed up the performance of Carmenta Engine, it is always recommended that you use a TileLayer if possible.
So we create a TileLayer and add it to the layers of our View.
$tileLayer = New-Object Carmenta.Engine.TileLayer
$view.Layers.add($tileLayer)
TileLayer is a group layer type that aggregates other layers. To be able to connect an operator, such as a VisualizationOperator or a ReadOperator, to your configuration you first need to add an OrdinaryLayer to the layers of your TileLayer in the same way you did for your View.
$layer = New-Object Carmenta.Engine.OrdinaryLayer
$tileLayer.Layers.add($layer)
To read data with Carmenta Engine you use a ReadOperator, and this should be connected to your OrdinaryLayer, and we can create the ReadOperator in the same way as you created the TileLayer and the OrdinaryLayer. However, the OrdinaryLayer does not have layers as input, instead it has an input property where you can connect your ReadOperator.
$readOperator = New-Object Carmenta.Engine.ReadOperator
$layer.Input = $readOperator
Carmenta Engine contains many different datsets for reading different kinds of data, and the easiest way of getting the correct dataset is to let Carmenta Engine create it for you using DataSetInfo to get suitable datasets for a specific file or a folder. In this use case we assume that we have a subfolder in the same folder as our PowerShell script with raster data.
Getting information about the files in the folder is as simple as:
$data = [Carmenta.Engine.DataSetInfo]::FromDirectory("$pwd\RasterData", $FALSE)
A folder can return information about multiple datasets if it contains different kinds of data. To simplify this article we assume that we only have one type of data in our folder so we can be quite sure that we can create a dataset from the first item that is returned.
$dataset = $data.item(0).CreateDataset()
After the dataset is created we improve the performance in Carmenta Engine by setting the index path for the dataset. We also set rasterCachePolicy and rasterCacheFilter to suitable values, and finally assign the dataset to the ReadOperator.
$dataset.indexPath = "$pwd\Index"
$dataset.rasterCachePolicy = [Carmenta.Engine.RasterCachePolicy]::Overviews
$dataset.rasterCacheFilter = [Carmenta.Engine.RasterCacheFilter]::Average
$readOperator.dataSet = $dataset
Now that we have created our configuration, we just have to save it and this can be done by using the save method on the Configuration class.
[Carmenta.Engine.Configuration]::Save("$pwd\configuration.px", $view)
And if you did everything correct, the final line in your code should be that you shutdown the Carmenta Engine runtime.
You should now be able to open up PowerShell on your computer and move to the directory where you saved your file, and run it by typing:
.\filename.ps1
This script should then generate a configuration similar to this one.

Find out how to develop OGC-compliant map services with Carmenta Server Core and deploy them on Microsoft Azure App Service using containerized workflows.
View Post
Learn about screen and CRS coordinates in Carmenta Engine. This guide explains how to manage coordinates when handling map representations of geographical objects.
View Post