Next Post
Adding feature editing tools to the WPF client application
Second article in our series on building a WPF client with Carmenta Engine. How to add application logic to support editing geographical features in the map.
View PostThis tutorial will show you the basics for creating a WPF client with the Carmenta Engine .NET Standard API. The application will use the popular Model-View-ViewModel (MVVM) pattern to separate business and presentation logic and create a maintainable and extensible application base.

Building on the concepts from the article on Carmenta Engine with MVVM, this tutorial is similar in scope to the three-part QtQuick article series.
Here, we will start from a clean WPF project and progressively add the following dependencies:
This archive contains the solution outlined in this article.
Requirements
Open Visual Studio and click Create a new project and select C# WPF Application. In the dialog, enter project and solution names and select a suitable location for the solution:

Click Next and select the Framework version .NET 8.0 (long-term support). Then click Create.
With the project created we need to add our dependencies:
If you’ve installed the Carmenta Engine SDK locally you can add a new NuGet package source to make the Carmenta Engine .NET Standard API available. In Visual Studio in the top menu click Tools > Options… > NuGet Package Manager > Package Sources > +. This will add a new package source, select that new source in the list and give it a better name, such as Carmenta and change the source to C:Program FilesCarmentaCarmenta Engine 5 SDKpackages.
With that done you should be able to add Carmenta Engine NuGet packages. Do this by right-clicking the project and selecting Manage NuGet Packages… In the top-right part of the dialog you can select specific Package Sources. Select the newly created source and browse available packages. You should see a list with three packages:
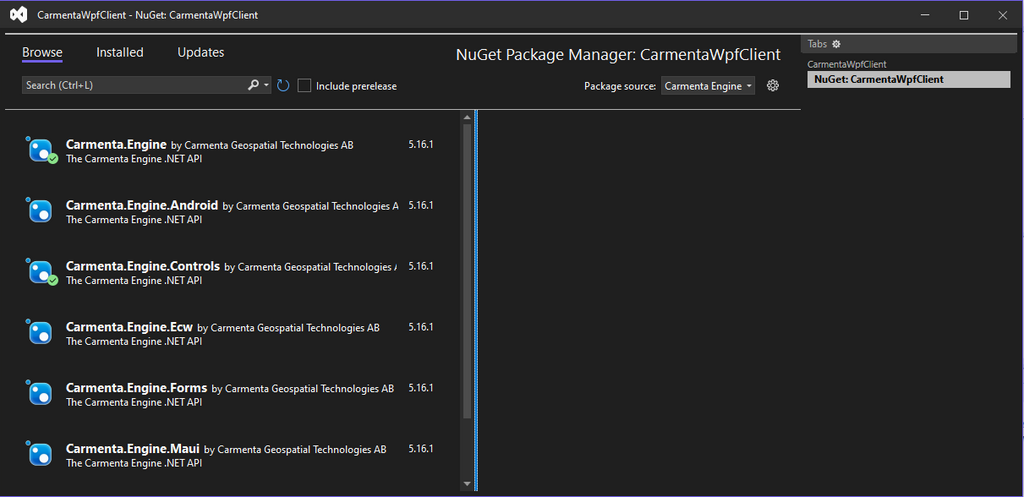
Add the following packages:
Also add the previously mentioned libraries, either by using the NuGet dialog with the nuget.org package source selected and adding the following:
Or by using the .NET CLI:
dotnet add CarmentaWpfClient package ModernWpfUI
dotnet add CarmentaWpfClient package CommunityToolkit.MVVM
dotnet add CarmentaWpfClient package Microsoft.Extensions.DependencyInjection
dotnet add CarmentaWpfClient package Microsoft.Xaml.Behaviors.Wpf
Let’s create some structure in the project by creating a few directories in the project root. Create the following directories:
To make the ModernWPF types available globally we need to add those as resources to our application. Do that by adding the following to App.xaml:
<Application ...
             xmlns:ui="http://schemas.modernwpf.com/2019"
			 ...>
    <Application.Resources>
        <ResourceDictionary>
            <ResourceDictionary.MergedDictionaries>
                <ui:ThemeResources />
                <ui:XamlControlsResources />
            </ResourceDictionary.MergedDictionaries>
        </ResourceDictionary>
    </Application.Resources>
</Application>
Let’s create a few basic models to encapsulate some important concepts in our application – the map layer and the map. Create a new class in Models/LayerModel.cs to hold information about a map layer:
using Carmenta.Engine;

using CarmentaWpfClient.Messages;

using CommunityToolkit.Mvvm.ComponentModel;
using CommunityToolkit.Mvvm.Messaging;

using System.Collections.Generic;
using System.Linq;

namespace CarmentaWpfClient.Models
{
    public class LayerModel : ObservableObject
    {
        private readonly Layer _layer;

        public LayerModel(Layer layer)
        {
            _layer = layer;

            if (layer is LayerSet layerSet)
            {
                Children = layerSet
                    .Layers
                    .Select(x => new LayerModel(x))
                    .ToList();
            }
        }

        public List Children { get; private set; } = new();

        public bool Enabled
        {
            get => _layer.Enabled;
            set => SetProperty(_layer.Enabled, value, x =>
            {
                _layer.Enabled = x;
                WeakReferenceMessenger.Default.Send(new UpdateViewMessage());
            });
        }

        public string Name => _layer.Name;
    }
}
The LayerModel acts as a simple wrapper around a Carmenta.Engine.Layer and provides methods for enabling and disabling individual layers. The class inherits from ObservableObject in the CommunityToolkit.Mvvm.ComponentModel namespace. This gives us access to a few useful utilities such as sending messages using WeakReferenceMessenger, a loosely coupled means of communication.
We also need to create the type UpdateViewMessage, used in the Enabled setter. Do this in Messages/UpdateViewMessage.cs:
namespace CarmentaWpfClient.Messages;

public record UpdateViewMessage;
Next, create the MapModel class in Models/MapModel.cs:
using Carmenta.Engine;

using CommunityToolkit.Mvvm.ComponentModel;

using System.Collections.Generic;
using System.Linq;

namespace CarmentaWpfClient.Models
{
    public partial class MapModel
    {
        public MapModel(string configurationPath)
        {
            var configuration = new Configuration(configurationPath);

            // Load the first View object from the configuration
            View = configuration.PublicNames.Select(name => configuration.GetPublicObject(name)).OfType().First();
            Name = string.IsNullOrEmpty(View.DisplayName) ? View.Name : View.DisplayName;

            Layers = View.Layers.Select(x => new LayerModel(x));
        }

        public void Update() => View?.Update();

        public string Name { get; }

        public IEnumerable Layers { get; }

        public View View { get; }
    }
}
In the constructor, we will try to read a Carmenta Engine configuration file from the provided configurationPath and find a View object. The MapModel will then act as a simple wrapper around this to provide a simple model API for a specific map by providing its layers, the internal View object, the name and some utilities for triggering a view update.
Before we start looking into the UI of the application, let’s create the view models. View models are responsible for managing most of the business logic of the application, but also provide properties and methods that the UI will consume through bindings to present to the user.
We will have four view models to start with:
MainViewModel – a root view model which will hold references to its children.MapViewModel – will manage maps and business logic related to the maps.LayerControlViewModel – will also hold a reference to a map, but with the purpose of interacting with its layers.DrawerMenuViewModel – will be used to manage the business logic related to displaying dynamic content in a drawer menu, such as the layer control view component and in later articles, a menu for tactical graphics and tools for feature creation and manipulation.But before we create a view model we will create a small utility component that will be responsible for loading and holding references to one or several maps. This is so that we can refer to the same component when we want to change maps through a simple API.
using CarmentaWpfClient.Models;

using System.Collections.Generic;
using System.IO;
using System.Linq;

namespace CarmentaWpfClient.Utils
{
    public class MapProvider
    {
        private readonly Dictionary _mapLookup;

        public MapProvider(string directory)
        {
            var pxFiles = Directory.GetFiles(directory, "*.px");

            _mapLookup = pxFiles
                .Select(x => new MapModel(x))
                .ToDictionary(x => x.Name);
        }

        public IEnumerable Maps => _mapLookup.Values;

        public bool TryGetMap(string mapName, out MapModel mapModel)
            => _mapLookup.TryGetValue(mapName, out mapModel);
    }
}
This simple class will read all Carmenta Engine configuration files (PX files) in the specified directory and create MapModels that will be provided through a simple API – either as a collection through the Maps property or using the TryGet lookup method through TryGetMap.
With that in place, we can create the first view model, MapViewModel.
using Carmenta.Engine;

using CarmentaWpfClient.Messages;
using CarmentaWpfClient.Models;
using CarmentaWpfClient.Utils;

using CommunityToolkit.Mvvm.ComponentModel;
using CommunityToolkit.Mvvm.Messaging;

using System.Linq;

namespace CarmentaDemoWPF.ViewModels
{
    public partial class MapViewModel : ObservableObject, IRecipient
    {
        private readonly MapProvider _mapProvider;

        [ObservableProperty]
        private MapModel _currentMap;

        public MapViewModel(MapProvider mapProvider)
        {
            WeakReferenceMessenger.Default.Register(this);
            _mapProvider = mapProvider;

            CurrentMap = _mapProvider.Maps.First();
        }

        public Tool? Tool { get; private set; } = new StandardTool();

        public void Receive(UpdateViewMessage message) => CurrentMap.Update();
    }
}
The MapViewModel will stora a MapModel in the CurrentMap observable property. It also listens to the UpdateViewMessage which will be sent by other components when the view should be updated. It also holds a reference to a Carmenta.Engine.Tool in the Tool property. This will enable us to interact with the current map using standard interaction.
Let’s create the LayerControlViewModel next.
using CarmentaWpfClient.Models;
using CarmentaWpfClient.Utils;

using System.Collections.ObjectModel;
using System.Linq;

namespace CarmentaWpfClient.ViewModels
{
    public class LayerControlViewModel
    {
        private readonly MapProvider _mapProvider;

        public LayerControlViewModel(MapProvider mapProvider)
        {
            _mapProvider = mapProvider;

            Layers = new(_mapProvider.Maps.First().Layers);
        }

        public ObservableCollection Layers { get; private set; } = new();
    }
}
This simple class also consumes the MapProvider and holds a reference to the current map’s layers through the Layers property.
Tip: Note the use of primary constructor syntax here. Added in C# 12 with .NET 8, this simplifies the declaration of classes with no need for complex initialization.
Now, let’s create the slightly more complicated DrawerMenuViewModel which will manage the interaction with the drawer menu for presenting dynamic content.
using CarmentaWpfClient.ViewModels;

using CommunityToolkit.Mvvm.ComponentModel;
using CommunityToolkit.Mvvm.Input;

using System.Windows.Controls;

namespace CarmentaDemoWPF.ViewModels
{
    public partial class DrawerMenuViewModel(LayerControlViewModel _layerControlViewModel) : ObservableObject
    {
        [ObservableProperty]
        private object? _currentViewModel;

        private bool _isOpen;

        public bool IsOpen
        {
            get => _isOpen;
            set => SetProperty(ref _isOpen, value);
        }

        [RelayCommand]
        public void ButtonClicked() => IsOpen = !IsOpen;

        [RelayCommand]
        private void SelectionChanged(SelectionChangedEventArgs? e)
        {
            if (e is null) return;
            if (e.AddedItems.Count == 0)
            {
                CurrentViewModel = null;
                return;
            }

            if (e.AddedItems[0] is ListBoxItem listBoxItem)
            {
                var tag = listBoxItem.Tag.ToString();

                CurrentViewModel = tag switch
                {
                    "layers" => _layerControlViewModel,
                    _ => null
                };
            }
        }
    }
}
This class holds an injected reference to the LayerControlViewModel in the CurrentViewModel property. The LayerControlViewModel will be used to bind to the UI.
We will return to this part later when we create the UI, but here’s how it works in a nutshell. The CurrentViewModel property will be able to hold any type of view model. We can match the corresponding view component to it later to dynamically switch content in the drawer menu.
With those types in place, we have to create the MainViewModel which will be the root view model for our application.
using CarmentaDemoWPF.ViewModels;

namespace CarmentaWpfClient.ViewModels
{
    public class MainViewModel(MapViewModel mapViewModel, DrawerMenuViewModel drawerMenuViewModel)
    {
        public MapViewModel MapViewModel { get; } = mapViewModel;

        public DrawerMenuViewModel DrawerMenuViewModel { get; } = drawerMenuViewModel;
    }
}
The MainViewModel exposes the injected MapViewModel and DrawerMenuViewModel through simple read-only properties. We will return to the topic of injection and dependency management later in this article.
Before we create the views, let’s have a look at what we aim for our application to look like in terms of components:
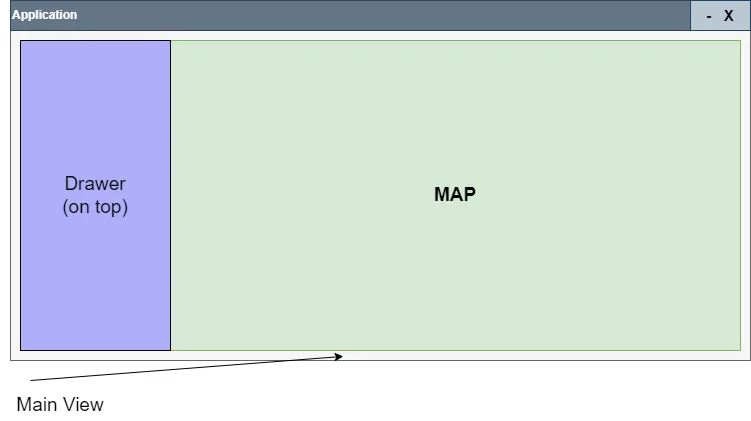
The application itself is hosted in a window. This will be according to the default application setup, but inside the window, we will subdivide the application into views, where each view will manage a specific set of user interactions.
The MainView will hold its child components and control the size and position of those. The child components will be the drawer menu on the left-hand side and the map view next to that. The Drawer menu will expand its content on top of the map when necessary.
Create a new UserControl called MapView.
<UserControl x:Class="CarmentaWpfClient.Views.MapView"
             xmlns="http://schemas.microsoft.com/winfx/2006/xaml/presentation"
             xmlns:x="http://schemas.microsoft.com/winfx/2006/xaml"
             xmlns:mc="http://schemas.openxmlformats.org/markup-compatibility/2006"
             xmlns:d="http://schemas.microsoft.com/expression/blend/2008"
             xmlns:local="clr-namespace:CarmentaWpfClient.Views" xmlns:controls="https://carmenta.com/engine/controls"
             mc:Ignorable="d"
             DataContextChanged="OnDataContextChanged"
             d:DesignHeight="450" d:DesignWidth="800">
    <Grid>
        <controls:MapControl x:Name="MapControl"/>
    </Grid>
</UserControl>
This component simply presents a Carmenta Engine MapControl which is the Carmenta Engine WPF component responsible for rendering maps. We hook up a handler for the DataContextChanged event, so that we can update the properties of the MapControl when the MapView is bound to a new MapViewModel.
We also need to make a slight addition to the code-behind file.
using Carmenta.Engine.Controls;
using CarmentaDemoWPF.ViewModels;

...

namespace CarmentaWpfClient.Views
{
    ///
    /// Interaction logic for MapView.xaml
    ///
    public partial class MapView : UserControl
    {
        ...

        private void OnDataContextChanged(object sender, DependencyPropertyChangedEventArgs e)
        {
            if (e.NewValue is MapViewModel mapViewModel)
            {
                MapControl.View = mapViewModel.CurrentMap.View;
                MapControl.Tool = mapViewModel.Tool;
            }
        }
    }
}
This creates an event handler for the DataContextChanged event and sets the View on the MapControl to the View of the current map held by the MapViewModel.
We also want a layer control which will display a tree view of the layers of the current map. We can use the HierarchicalDataTemplate together with the TreeView component for achieving this in WPF.
<UserControl x:Class="CarmentaWpfClient.Views.LayerControlView"
             xmlns="http://schemas.microsoft.com/winfx/2006/xaml/presentation"
             xmlns:x="http://schemas.microsoft.com/winfx/2006/xaml"
             xmlns:mc="http://schemas.openxmlformats.org/markup-compatibility/2006"
             xmlns:d="http://schemas.microsoft.com/expression/blend/2008"
             mc:Ignorable="d"
             d:DesignHeight="450" d:DesignWidth="800">
    <ScrollViewer Background="{DynamicResource SystemAccentColorDark2Brush}" >
        <TreeView ItemsSource="{Binding Layers}" >
            <TreeView.ItemTemplate>
                <HierarchicalDataTemplate ItemsSource="{Binding Children}">
                    <Grid>
                        <Grid.ColumnDefinitions>
                            <ColumnDefinition Width="30"/>
                            <ColumnDefinition Width="*"/>
                        </Grid.ColumnDefinitions>
                        <CheckBox Grid.Column="0" IsChecked="{Binding Enabled, Mode=TwoWay}" Width="12"/>
                        <TextBlock Grid.Column="1" Text="{Binding Name}" VerticalAlignment="Center"/>
                    </Grid>
                </HierarchicalDataTemplate>
            </TreeView.ItemTemplate>
        </TreeView>
    </ScrollViewer>
</UserControl>
The TreeView binds to the Layers property on the LayerControlViewModel (via TreeView.ItemsSource) and displays the list according to the HierarchicalDataTemplate.
The drawer menu will present a list of options and use a ContentPresenter to display dynamic view components by matching view-view model pairs by type-matching the corresponding DataTemplate.
<UserControl x:Class="CarmentaWpfClient.Views.DrawerMenuView"
             xmlns="http://schemas.microsoft.com/winfx/2006/xaml/presentation"
             xmlns:x="http://schemas.microsoft.com/winfx/2006/xaml"
             xmlns:mc="http://schemas.openxmlformats.org/markup-compatibility/2006"
             xmlns:d="http://schemas.microsoft.com/expression/blend/2008"
             xmlns:ui="http://schemas.modernwpf.com/2019"
             xmlns:b="http://schemas.microsoft.com/xaml/behaviors"
             xmlns:local="clr-namespace:CarmentaWpfClient.Views"
             xmlns:vm="clr-namespace:CarmentaWpfClient.ViewModels"
             mc:Ignorable="d"
             d:DesignHeight="450" d:DesignWidth="800">
    <UserControl.Resources>
        <DataTemplate DataType="{x:Type vm:LayerControlViewModel}">
            <local:LayerControlView />
        </DataTemplate>
        <BooleanToVisibilityConverter x:Key="BooleanToVisibilityConverter"/>
    </UserControl.Resources>

    <Grid Background="{StaticResource SystemAccentColorDark1Brush}">
        <Grid.ColumnDefinitions>
            <ColumnDefinition/>
            <ColumnDefinition/>
        </Grid.ColumnDefinitions>
        <Grid Grid.Column="0">

            <Grid.RowDefinitions>
                <RowDefinition Height="Auto"/>
                <RowDefinition />
            </Grid.RowDefinitions>

            <StackPanel Orientation="Horizontal" >
                <Button Command="{Binding ButtonClickedCommand}">
                    <ui:SymbolIcon Symbol="GlobalNavigationButton"/>
                </Button>
            </StackPanel>

            <ListBox Grid.Row="1" Visibility="{Binding IsOpen, Converter={StaticResource BooleanToVisibilityConverter}}" SelectionMode="Extended">
                <b:Interaction.Triggers>
                    <b:EventTrigger EventName="SelectionChanged">
                        <b:InvokeCommandAction Command="{Binding SelectionChangedCommand}" PassEventArgsToCommand="True"/>
                    </b:EventTrigger>
                </b:Interaction.Triggers>
                <ListBoxItem Tag="layers">
                    Layers
                </ListBoxItem>
            </ListBox>
        </Grid>
        <Grid Grid.Column="1">
            <ContentPresenter Content="{Binding CurrentViewModel}" />
        </Grid>
    </Grid>
</UserControl>
The final step for our UI is to connect everything up by composing the different parts in the main view. To achieve something similar to the architecture diagram we saw earlier, add the following code to a new file:
<UserControl x:Class="CarmentaWpfClient.Views.MainView"
             xmlns="http://schemas.microsoft.com/winfx/2006/xaml/presentation"
             xmlns:x="http://schemas.microsoft.com/winfx/2006/xaml"
             xmlns:mc="http://schemas.openxmlformats.org/markup-compatibility/2006"
             xmlns:d="http://schemas.microsoft.com/expression/blend/2008"
             xmlns:local="clr-namespace:CarmentaWpfClient.Views"
             mc:Ignorable="d"
             d:DesignHeight="450" d:DesignWidth="800">
    <Grid>
        <local:MapView DataContext="{Binding MapViewModel}"/>
        <Grid>
            <Grid.ColumnDefinitions>
                <ColumnDefinition Width="Auto" />
                <ColumnDefinition Width="*" />
            </Grid.ColumnDefinitions>
            <local:DrawerMenuView Grid.Column="0" DataContext="{Binding DrawerMenuViewModel}"/>
        </Grid>
    </Grid>
</UserControl>
We use a grid component to achieve the general application layout and we use the binding markup extension syntax to bind the data context of the MapView and the DrawerMenuViewModel to the respective properties on the MainViewModel.
The finishing step is to add the newly created set of components to the main application window. We do this with a simple modification of MainWindow.xaml:
<Window x:Class="CarmentaWpfClient.MainWindow"
        xmlns="http://schemas.microsoft.com/winfx/2006/xaml/presentation"
        xmlns:x="http://schemas.microsoft.com/winfx/2006/xaml"
        xmlns:d="http://schemas.microsoft.com/expression/blend/2008"
        xmlns:mc="http://schemas.openxmlformats.org/markup-compatibility/2006"
        xmlns:views="clr-namespace:CarmentaWpfClient.Views"
        mc:Ignorable="d"
        Title="MainWindow" Height="450" Width="800">
    <Grid>
        <views:MainView />
    </Grid>
</Window>
Dependency injection is a common pattern where a type receives other types that it depends on, usually by injecting the dependent types in the constructor. This is a way of achieving inversion of control (IoC) where components are decoupled and dependencies are managed by a component specifically designed for service location. Unlike explicitly instantiating dependent types in the constructor or some method (sometimes referred to as “newing up” objects), this decouples types from their dependencies and moves lifetime management of both the type and its dependencies to the parent object.
Open App.xaml.cs and add the following:
using Microsoft.Extensions.DependencyInjection;
using System;
using System.Windows;

namespace CarmentaWpfClient
{
    ///
    /// Interaction logic for App.xaml
    ///
    public partial class App : Application
    {
        public App()
        {
            // Initialize the Carmenta Engine runtime
            Runtime.Initialize();
            Services = ConfigureServices();
        }

        public new static App Current => (App)Application.Current;

        public IServiceProvider Services { get; }

        private static IServiceProvider ConfigureServices()
        {
            var services = new ServiceCollection();

            return services.BuildServiceProvider();
        }
    }
}
The ConfigureServices method is where we will register our application’s services for dependency resolution. Services can have different scopes and lifetimes that are controlled by using different registration methods on the ServiceCollection before the ServiceProvider is built. Register the view models and MapProvider as services by adding the following to ConfigureServices:
...

namespace CarmentaWpfClient
{

    ...

        private static IServiceProvider ConfigureServices()
        {
            var services = new ServiceCollection();

            services.AddSingleton(x =>
            {
                var pxFileDirectoryPath = Path.GetDirectoryName(
                    Assembly.GetExecutingAssembly().Location);
                return new MapProvider(pxFileDirectoryPath);
            });

            services.AddTransient
            services.AddTransient();
            services.AddTransient
            services.AddTransient

            return services.BuildServiceProvider();
        }
    ...
}
To have a map configuration (PX) file that the MapProvider can load, copy the sample map configuration from C:\Program Files\Carmenta\Carmenta Engine 5 SDK\samples\MapConfigurations\world_map.px to the project directory and add it to the project in Visual Studio. Change the Copy to Output Directory property to Copy if newer and make sure the Build Action property value is set to None. This will ensure that the PX file is copied to the build directory without being embedded into the output binary so we can access it using the conventional .NET file APIS.
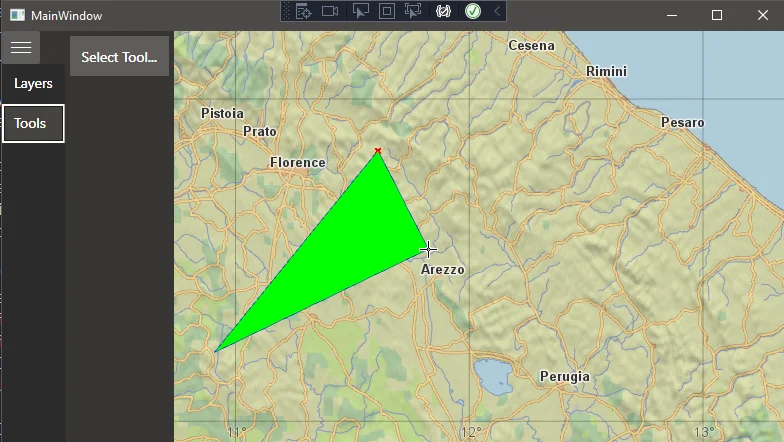
Now, build the application and run it. You should see something similar to the following:
In the next few articles, we will keep extending the application to add support for tactical graphics and eventually support for collaborating with several clients in real-time using WebSockets and SignalR.
Second article in our series on building a WPF client with Carmenta Engine. How to add application logic to support editing geographical features in the map.
View Post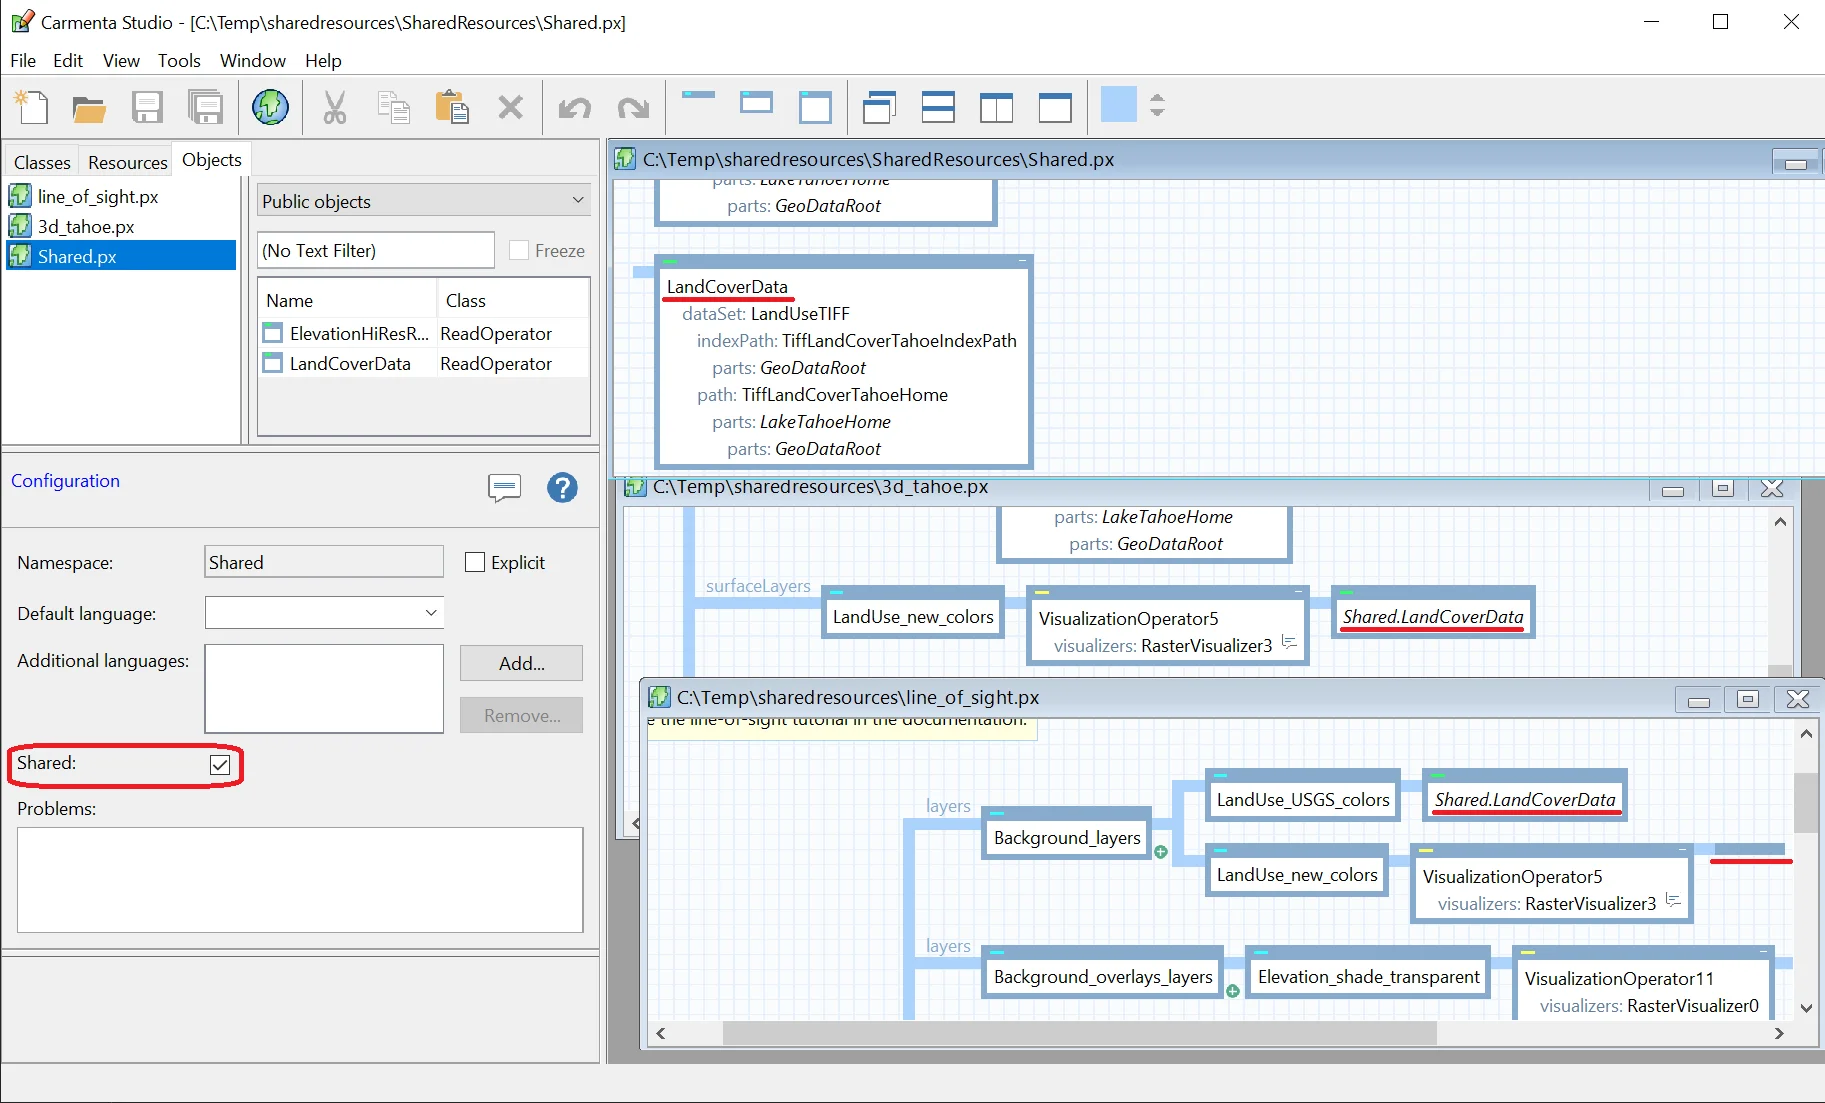
A presention of tools to create shared public objects that can be used by multiple different configuration files and only exist as a single instance in memory.
View Post