Next Post
Adding tactical symbol support to the WPF application
Learn how to add support for tactical symbols in our series on MVVM (Model-View-ViewModel) and Carmenta Engine in C#.
View PostIn this second part of the article series covering the topic of building a WPF client with Carmenta Engine, we will add application logic to support editing geographical features in the map.
If you didn’t follow the previous article, please do that first since we will keep extending the application we built during that article.
This archive contains the solution outlined below.
Geographical features can be read from many different sources in Carmenta Engine, for example, different file-based sources such as shapefiles, map packages or remote sources such as web services or databases. The most convenient way of handling features created by the application itself is to store them in a MemoryDataSet. If the MemoryDataSet is attached properly to the View one will also have great options for visualizing the features as well.
Let’s modify our map configuration to add a new OrdinaryLayer, a series of operators and a MemoryDataSet so that we have a foundation for adding the application logic for editing features. Open world_map.px in the project root directory in Carmenta Studio. Create a new OrdinaryLayer below the existing LongLatGrid OrdinaryLayer and name it FeatureLayer. Then add a VisualizationOperator to the newly created OrdinaryLayer and a ReadOperator to the VisualizationOperator. Then add the MemoryDataSet to the ReadOperator, name it FeatureMemoryDataSet. Finally, add some simple visualization to the VisualizationOperator, a LineVisualizer, a SymbolVisualizer and a PolygonVisualizer with default settings will give us a good start. The modified map configuration will look like this:
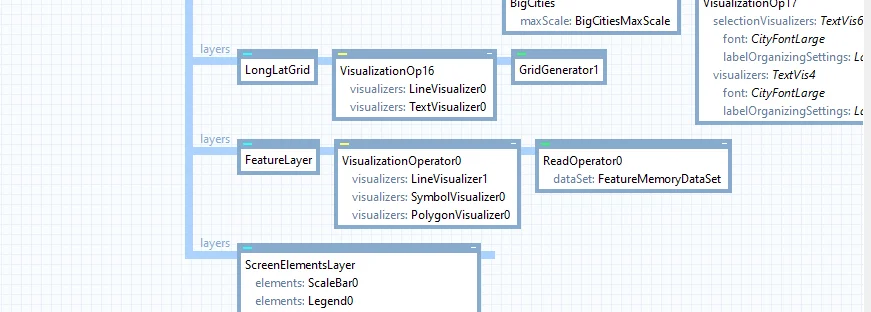
To make it possible to interact with features after they have been created, select the OrdinaryLayer and change the Selectable property value to True.
Let’s start by setting up the tools menu, this will be opened from the drawer menu from the previous article. Create a new user control for the view in Views\ToolsMenuView.xaml and add the following code:
<UserControl x:Class="CarmentaWpfClient.Views.ToolsMenuView"
             xmlns="http://schemas.microsoft.com/winfx/2006/xaml/presentation"
             xmlns:x="http://schemas.microsoft.com/winfx/2006/xaml"
             xmlns:mc="http://schemas.openxmlformats.org/markup-compatibility/2006"
             xmlns:d="http://schemas.microsoft.com/expression/blend/2008"
             mc:Ignorable="d"
             d:DesignHeight="450" d:DesignWidth="800">
    <Grid>
        <StackPanel HorizontalAlignment="Center">
            <Menu Background="{StaticResource SystemControlBackgroundBaseLowBrush}" Margin="5" >
                <MenuItem Header="Select Tool..." >
                    <MenuItem Header="Standard" Tag="standard" Command="{Binding ItemSelectedCommand}" CommandParameter="{Binding RelativeSource={RelativeSource Self}, Path=Tag}"/>
                    <Separator />
                    <MenuItem Header="Point" Tag="point" Command="{Binding ItemSelectedCommand}" CommandParameter="{Binding RelativeSource={RelativeSource Self}, Path=Tag}"/>
                    <MenuItem Header="Line" Tag="line" Command="{Binding ItemSelectedCommand}" CommandParameter="{Binding RelativeSource={RelativeSource Self}, Path=Tag}"/>
                    <MenuItem Header="Polygon" Tag="polygon" Command="{Binding ItemSelectedCommand}" CommandParameter="{Binding RelativeSource={RelativeSource Self}, Path=Tag}"/>
                </MenuItem>
            </Menu>
        </StackPanel>
    </Grid>
</UserControl>
It adds a Menu control with menu items corresponding to different tools. The Command binding expression binds to a command on the ViewModel called ItemsSelectedCommand and passes the Tag property value as a method parameter. Let’s create the ViewModel by adding a class called ToolsMenuViewModel:
using Carmenta.Engine;

using CarmentaWpfClient.Messages;

using CommunityToolkit.Mvvm.ComponentModel;
using CommunityToolkit.Mvvm.Input;
using CommunityToolkit.Mvvm.Messaging;

namespace CarmentaWpfClient.ViewModels
{
    public partial class ToolsMenuViewModel : ObservableObject
    {
        [RelayCommand]
        public void ItemSelected(string? tag)
        {
            if (tag is null) return;

            ChangeToolMessage message = tag switch
            {
                "point" => new ChangeToolMessage(ToolType.Create, ToolCreateMode.Point),
                "line" => new ChangeToolMessage(ToolType.Create, ToolCreateMode.Line),
                "polygon" => new ChangeToolMessage(ToolType.Create, ToolCreateMode.Polygon),
                _ => new ChangeToolMessage(ToolType.Standard),
            };
            WeakReferenceMessenger.Default.Send(message);
        }
    }
}
The ItemsSelectedCommand wraps the ItemsSelected method that will receive a tag in the form of a string. It uses a switch expression to create a ChangeToolMessage (coming soon) to indicate the selected tool type and mode on the tool. The message is then dispatched using the WeakReferenceMessenger.
Let’s create ChangeToolMessage itself next.
using Carmenta.Engine;

namespace CarmentaWpfClient.Messages;

public enum ToolType
{
    Standard,
    Create
}

public record ChangeToolMessage(ToolType ToolType, ToolCreateMode? ToolCreateMode = null);
The message is a simple record with two enum properties indicating the tool type (the standard tool for map interaction or a create tool for creating features) and the tool create mode indicating the type of feature geometry to create.
Now let’s edit the MapViewModel to receive the ChangeToolMessage and set the tool accordingly. The MapViewModel will have to keep the different tools in separate private fields and set the current tool according to the value of the properties in the ChangeToolMessage. This way, ToolsMenuViewModel doesn’t need to know anything about the Tool implementations that MapViewModel uses.
Let’s edit MapViewModel.cs to accommodate this functionality:
using Carmenta.Engine;

using CarmentaWpfClient.Messages;
using CarmentaWpfClient.Models;
using CarmentaWpfClient.Utils;

using CommunityToolkit.Mvvm.ComponentModel;
using CommunityToolkit.Mvvm.Messaging;

using System.Linq;

namespace CarmentaDemoWPF.ViewModels
{
    public partial class MapViewModel : ObservableObject,
        IRecipient, IRecipient
    {
        private CreateTool? _createTool;
        private StandardTool _standardTool = new();

        [ObservableProperty]
        private ITool? _currentTool;

        private readonly MapProvider _mapProvider;

        [ObservableProperty]
        private MapModel? _currentMap;

        public MapViewModel(MapProvider mapProvider)
        {
            WeakReferenceMessenger.Default.RegisterAll(this);
            _mapProvider = mapProvider;

            CurrentMap = _mapProvider.Maps.First();
            CurrentTool = _standardTool;

            var featureMemoryDataSet = CurrentMap.View
                .GetTypedObject("FeatureMemoryDataSet");

            if (featureMemoryDataSet is not null)
                _createTool = new CreateTool(featureMemoryDataSet);
        }

        public void Receive(UpdateViewMessage message) => CurrentMap?.Update();

        public void Receive(ChangeToolMessage message)
        {
            if (message is { ToolType: ToolType.Create, ToolCreateMode: not null })
            {
                if (_createTool == null)
                {
                    return;
                }

                _createTool.CreateMode = message.ToolCreateMode.Value;
                CurrentTool = _createTool;
            }
            else
                CurrentTool = _standardTool;
        }
    }
}
We made MapViewModel inherit from ObservableObject, giving us access to the SetProperty method which will signal to any listeners that the property value was changed. This will be used by the view to update the tool. We also implemented the IRecipient interface and changed the registration method call in the constructor to RegisterAll to register all Receive methods in the WeakReferenceMessenger. The new Receive(ChangeToolMessage) overload handles setting the respective tool on the CurrentTool property.
Notice that the CreateTool requires a MemoryDataSet when it’s being initialized, this MemoryDataSet is retrieved from the View by using an extension method that we will create in Utils\EngineExtensions.cs:
using Carmenta.Engine;

using System.Linq;

namespace CarmentaWpfClient.Utils;

public static class EngineExtensions
{
    public static T? GetTypedObject(this View view, string name = "")
        where T : ResourceObject
    {
        var objectsOfType = view.GetChildObjects().OfType();

        return string.IsNullOrEmpty(name) ? objectsOfType.FirstOrDefault() : objectsOfType.FirstOrDefault(x => x.Name == name);
    }
}
This method enables us to search for child objects of a certain type in the View hierarchy, optionally searching by name of the object. This gives us a handy way to find objects without having to clutter our ViewModels with overly complex LINQ queries. In the MapViewModel constructor, we use this extension method to find the MemoryDataSet we added to the map configuration earlier, then we use that when instantiating the CreateTool.
At this point, our view will not be aware when we change the value of the CurrentTool property. To fix that we will have to subscribe to the PropertyChanged event on the MapViewModel (provided by the ObservableObject base class). Do this by adding the following to MapView.xaml.cs:
...

namespace CarmentaWpfClient.Views
{
    ///
    /// Interaction logic for MapView.xaml
    ///
    public partial class MapView : UserControl
    {
        public MapView()
        {
            InitializeComponent();
        }

        private void OnDataContextChanged(object sender, DependencyPropertyChangedEventArgs e)
        {
            if (e.NewValue is MapViewModel mapViewModel)
            {
                mapViewModel.PropertyChanged += OnPropertyChanged;
                MapControl.View = mapViewModel.CurrentMap.View;
                MapControl.Tool = mapViewModel.CurrentTool;
            }
        }

        private void OnPropertyChanged(object? sender, System.ComponentModel.PropertyChangedEventArgs e)
        {
            if (sender is not MapViewModel mapViewModel)
                return;

            if (e.PropertyName == nameof(MapViewModel.CurrentTool))
                MapControl.Tool = mapViewModel.CurrentTool;
        }
    }
}
If the sender is a MapViewModel and if the property that was updated was MapViewModel.CurrentTool, we update the MapControl.Tool property to match.
The last step is to make sure that the DrawerMenu will display the ToolsMenu when we select the Tools option in the drawer. Edit the DrawerMenuViewModel.SelectionChanged event handler to add a new case in the switch expression for “tools”. We also have to inject the ToolsMenuViewModel and store that in a private field:
...

namespace CarmentaDemoWPF.ViewModels
{
    public partial class DrawerMenuViewModel(
        LayerControlViewModel _layerControlViewModel,
        ToolsMenuViewModel _toolsMenuViewModel) : ObservableObject
    {
        [ObservableProperty]
        private object? _currentViewModel;

        private bool _isOpen;

        public bool IsOpen
        {
            get => _isOpen;
            set => SetProperty(ref _isOpen, value);
        }

        [RelayCommand]
        public void ButtonClicked() => IsOpen = !IsOpen;

        [RelayCommand]
        private void SelectionChanged(SelectionChangedEventArgs? e)
        {
            if (e is null) return;
            if (e.AddedItems.Count == 0)
            {
                CurrentViewModel = null;
                return;
            }

            if (e.AddedItems[0] is ListBoxItem listBoxItem)
            {
                var tag = listBoxItem.Tag.ToString();

                CurrentViewModel = tag switch
                {
                    "layers" => _layerControlViewModel,
                    "tools" => _toolsMenuViewModel,
                    _ => null
                };
            }
        }
    }
}
Now let’s add the ToolsMenuView to the contextual part of DrawerMenuView.xaml by adding it to the Resources section:
<UserControl ...>
    <UserControl.Resources>
        ...
        <DataTemplate DataType="{x:Type vm:ToolsMenuViewModel}">
            <local:ToolsMenuView />
        </DataTemplate>
		...
    </UserControl.Resources>
	<Grid Background="{StaticResource SystemAccentColorDark1Brush}">
       ...
    </Grid>
</UserControl>
Finally, before we can test our changes, we need to add the ToolsMenuViewModel to the list of dependencies by modifying the ConfigureServices method of App.xaml.cs:
...
private static IServiceProvider ConfigureServices()
{
    ...
    services.AddTransient();
    return services.BuildServiceProvider();
}
...
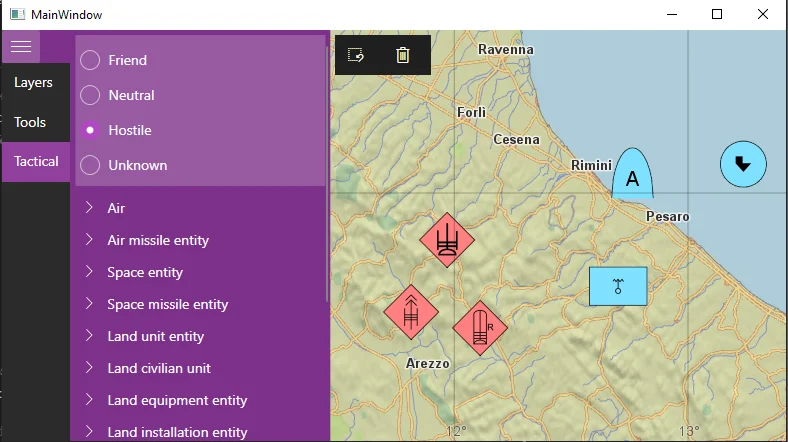
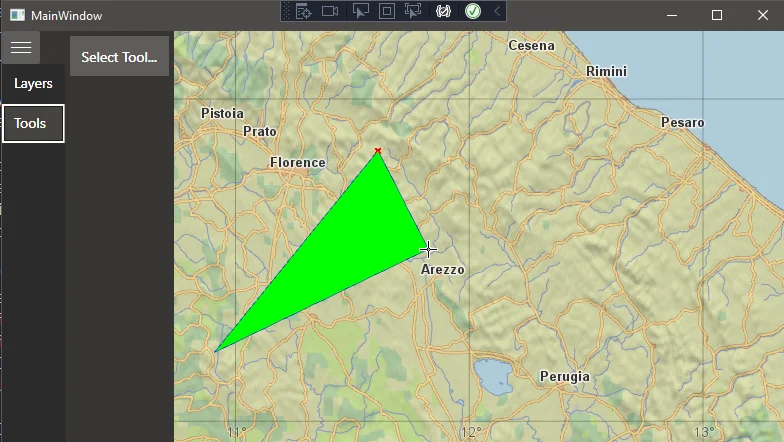
Start the application and select the Tools option in the drawer menu. This will expand the tools menu. Press the button and select an option in the menu, this will set the tool according to the selected option. Try it in the map and you should see the cursor change appearance when a create tool is selected:
While editing geometries consisting of several points, such as lines or polygons, simply double-click somewhere to make that the last point and exit editing mode.
Today, we have seen how we can add interaction to the map in the form of feature creation. We’ve added new ViewModels and set up zero-coupling communication lines between them using the WeakReferenceMessenger facility.
In the next article we’ll look at drawing more complex features, namely tactical graphics.
Learn how to add support for tactical symbols in our series on MVVM (Model-View-ViewModel) and Carmenta Engine in C#.
View Post
This tutorial covers the basics for creating a WPF client with the Carmenta Engine .NET Standard API, using the Model-View-ViewModel (MVVM) pattern.
View Post