In this tutorial, the second part in a series of three, we will continue to build on the project from the article on adding a layer control to a QtQuick application. We will add a DrawControl to the application allowing users to add basic shapes (points, lines and polygons) as well as tactical symbols to the map.
We will update the QML form to have a second panel, allowing you to switch between the LayerControl and our new DrawControl.
The extra resources needed to complete this tutorial, as well as the complete extended application, can be found here:
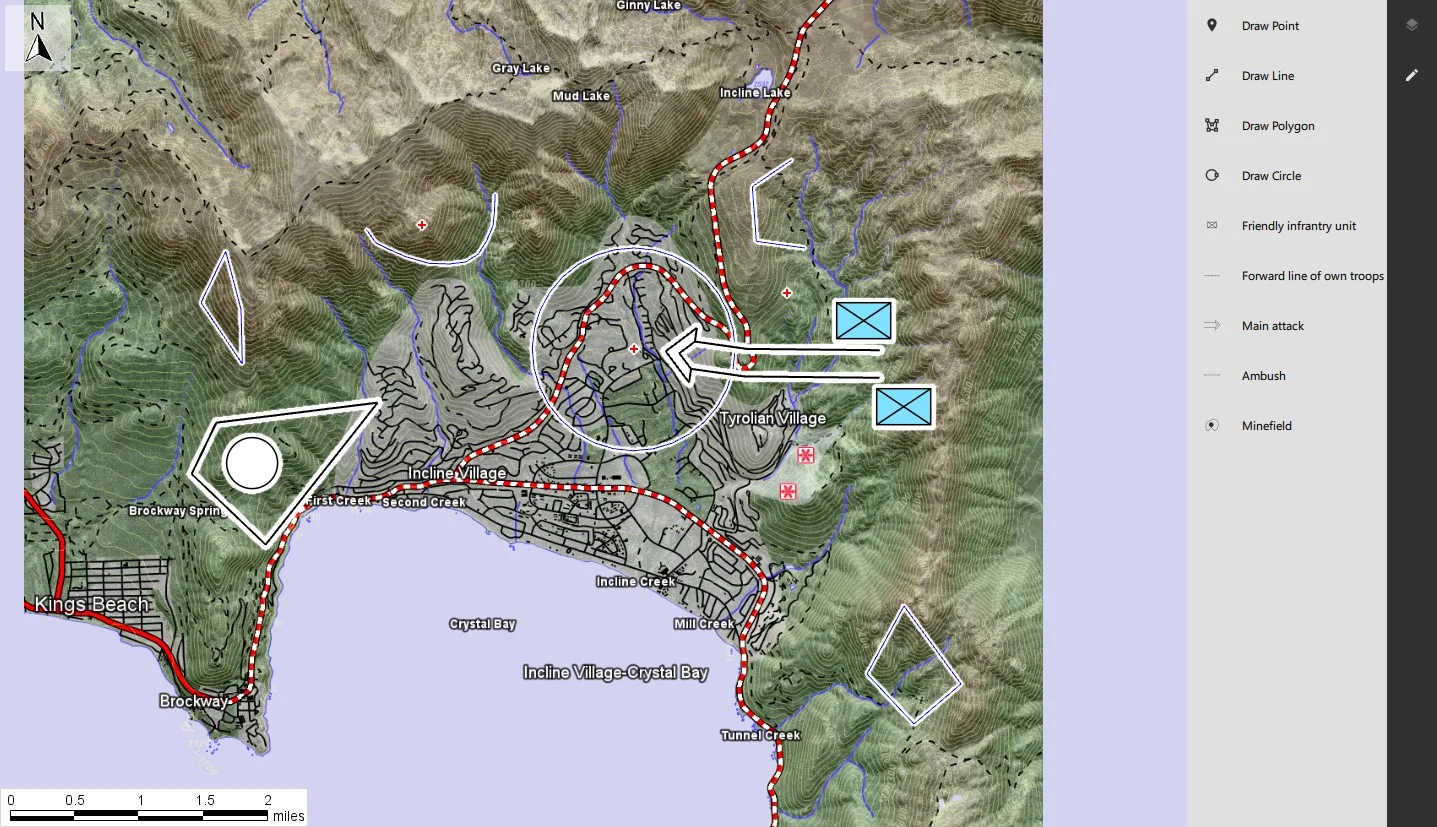
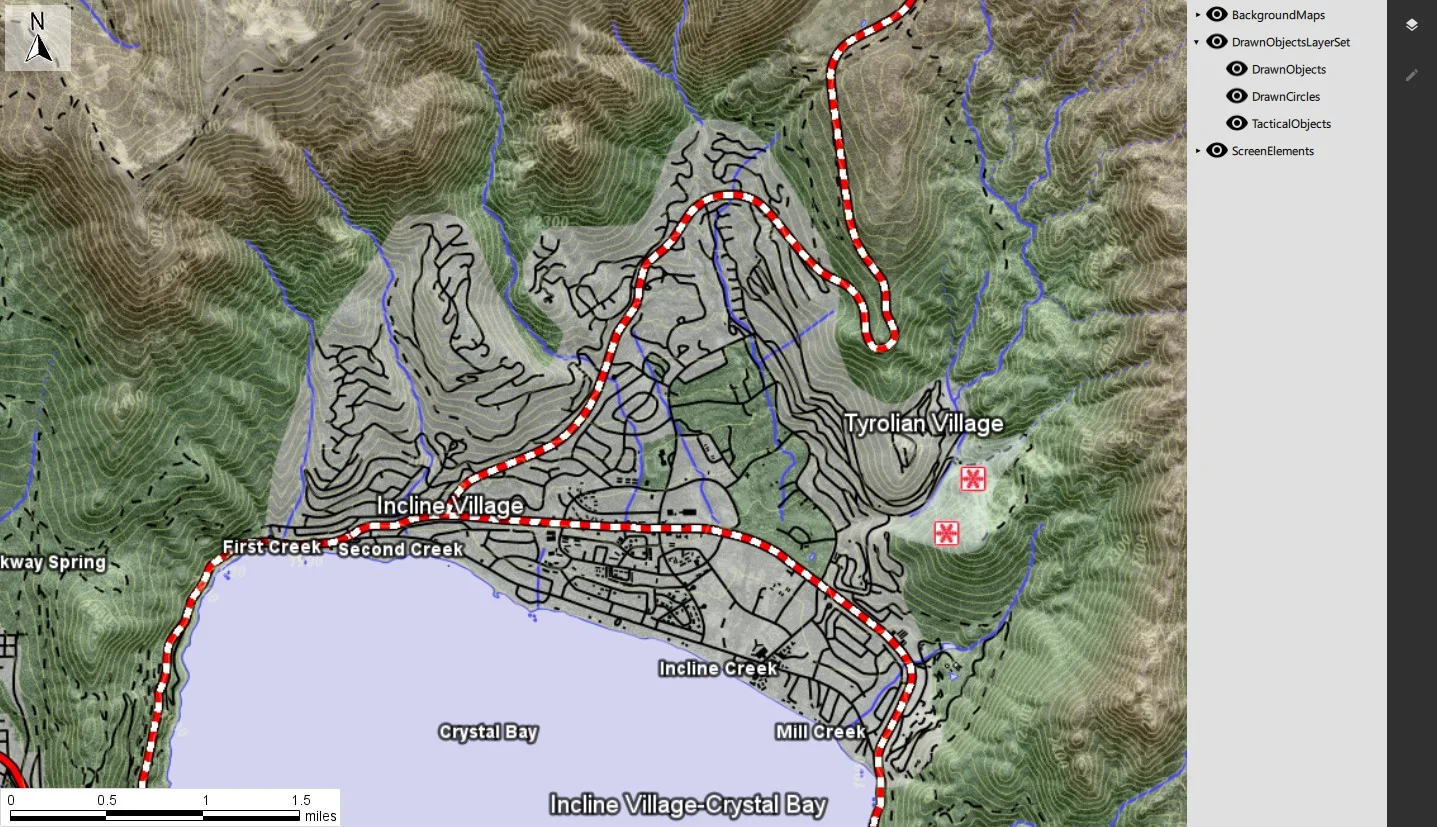
At the end of this tutorial the application UI will look like this:

Editing the configuration file
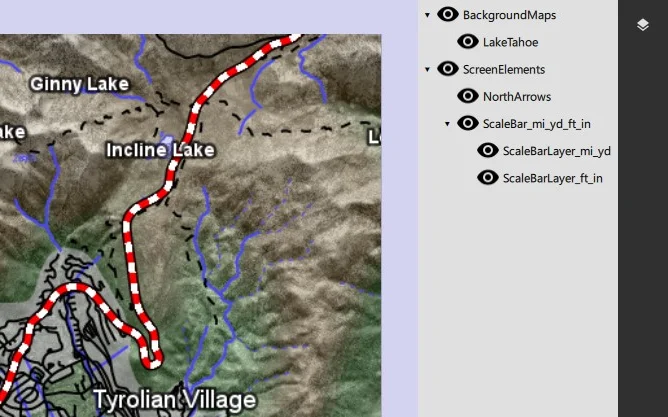
Let’s start first with the easy part: the configuration file. We will swap the configuration file with the one provided in the archive. It contains the layer structure for the objects and tactical features, as shown below:
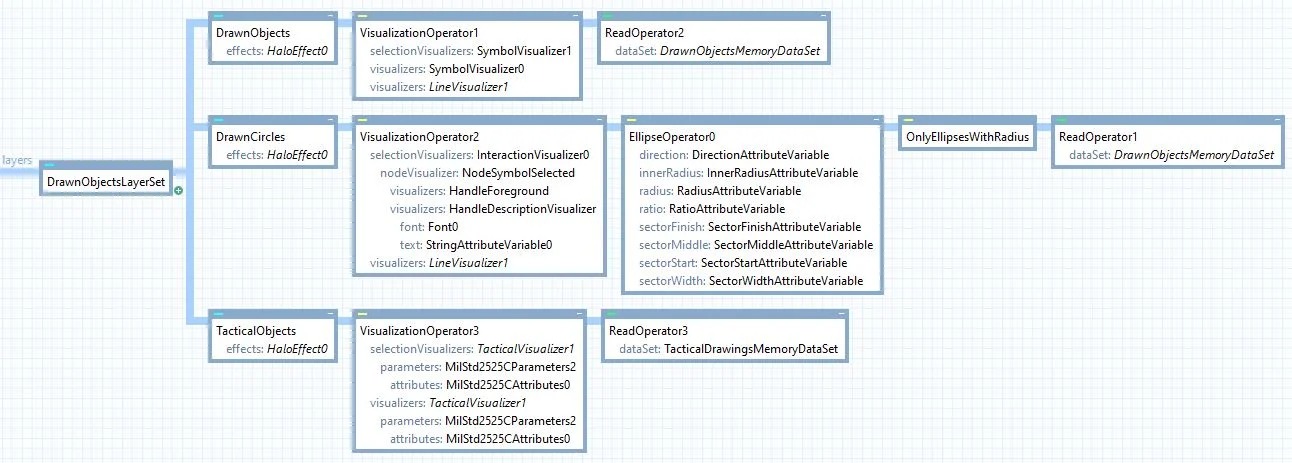
You can add more visualization or edit the existing one to further customize your objects (color, line style, polygon filling…).
If you start the application, you will notice the LayerControl already updated and working with the new layer:
Adding new files for TacticalDrawing
For this sample to work you will need to add new files to the project, from the archive retrieve the following files and add them to CMakeLists.txt:
tacticalsymbolitem.cpp
tacticalsymbolitem.h
tacticalsymbolsmodel.cpp
tacticalsymbolsmodel.h
TacticalSymbolsModel will be the class providing the information to the UI, we will see later how to add it to the qml context.
The class will read a file TacticalSymbols.csv available in carmenta.engine folder. This CSV contains examples of Tactical Symbols, you can update the list if you want, see MILSTD2525C Symbols for the list of symbols supported by Carmenta Engine. You can also read TacticalVisualizer, for more information about tactical symbols.
TacticalSymbolItem is an object describing one line of the CSV file read by TacticalSymbolsModel.
Editing the QML
In the previous article, we prepared the draw control but we left it empty. Now, it’s time to complete it. In main.qml, find the Rectangle with id:draw and replace the entire Rectangle with the following QML:
Rectangle {
    id: draw
    width: 200
    x: parent.width
    y: 0
    height: parent.height
    color: alternateColor

    ListModel {
        id: drawButtonsModel

        ListElement {
            name: "Draw Point"
            icon_name: "/map-marker.svg"
            draw_type: "point"
        }

        ListElement {
            name: "Draw Line"
            icon_name: "/vector-line.svg"
            draw_type: "line"
        }

        ListElement {
            name: "Draw Polygon"
            icon_name: "/vector-polygon.svg"
            draw_type: "polygon"
        }

        ListElement {
            name: "Draw Circle"
            icon_name: "/vector-circle.svg"
            draw_type: "circle"
        }
    }

    ListView {
        id: drawButtonsListView
        model: drawButtonsModel //setting previously defined ListModel as model
        height: 50*drawButtonsModel.count
        width: parent.width

        delegate: Row {
            height:  50
            spacing: 5
            Button {
                width: 50
                checkable: true
                checked: true
                anchors.verticalCenter: parent.verticalCenter
                display: AbstractButton.IconOnly
                icon.source: icon_name //icon source
                icon.color: sidebarColor
                background: Rectangle {
                    color: alternateColor
                }
                MouseArea {
                    id: mouseAreaDraw
                    width: parent.parent.parent.width
                    height: parent.height
                    onClicked: {
                        controller.drawOnMap(drawButtonsModel.get(index).draw_type)
                    }
                    Rectangle {
                        anchors.fill: mouseAreaDraw
                        color: mouseAreaDraw.pressed? sidebarColor : alternateColor
                        opacity: 0.3
                    }
                }
            }
            Text {
                text: name //display name
                anchors.verticalCenter: parent.verticalCenter
            }
        }
    }

    ListView {
        id: tacticalDrawing
        model: myTacticalModel // tactical model that we will instantiate in C++
        anchors.top: drawButtonsListView.bottom
        height: parent.height - drawButtonsListView.height
        width: parent.width

        delegate: Row {
            height: 50
            spacing: 5
            Button {
                width: 50
                checkable: true
                checked: true
                display: AbstractButton.IconOnly
                icon.source: myTacticalModel.requestImage(index) // our model will act as a provider and provide the images
                icon.cache: false
                icon.color: sidebarColor
                background: Rectangle {
                    color: alternateColor
                }
                anchors.verticalCenter: parent.verticalCenter

                MouseArea {
                    id: mouseAreaTacticalDraw
                    width: 200
                    height: parent.height
                    onClicked: {
                        controller.tacticalDrawOnMap(myTacticalModel.getSidcFromIndex(index)) // callback consists in getting the SIDC from the model and forwarding it to the controller
                                }
                    Rectangle {
                        anchors.fill: mouseAreaTacticalDraw
                        color: mouseAreaTacticalDraw.pressed? sidebarColor : alternateColor
                        opacity: 0.3
                    }
                }
            }
            Text {
                text: model.display // using the display role of the model to display
                anchors.verticalCenter: parent.verticalCenter
            }
        }
    }

    states: [
        State {
            when: (window.state === "DRAW")
            PropertyChanges {
                target: draw
                x: parent.width - width - sidebarWidth
            }
        },
        State {
            when: (window.state !== "DRAW")
            PropertyChanges {
                target: draw
                x: parent.width - sidebarWidth
            }
        }
    ]

    transitions: Transition {
        NumberAnimation {
            properties: "x"
            easing.type: Easing.InOutQuad
        }
    }
}
Add the extra icons for the new buttons in CMakeLists.txt. The required files are:
map-marker.svg
vector-line.svg
vector-polygon.svg
vector-circle.svg
If you look into the QML code, you will notice controller.drawOnMap(drawButtonsModel.get(index).draw_type)controller.tacticalDrawOnMap(myTacticalModel.getSidcFromIndex(index))controller refers to our existing Controller class which we will need to add to the QML context.
In main.cpp, after LayerModel is added to the QML context, add the following lines:
// Adding controller to QML context
ctxt->setContextProperty("controller", &Controller::instance());

// Adding tacticalModel to QML context
TacticalSymbolsModel* tacticalModel = new TacticalSymbolsModel();
ctxt->setContextProperty("myTacticalModel", tacticalModel);
Now, if you start the application, you will have the Draw control panel on the side with the different buttons. But if you interact with one of the buttons, the application will crash because our Controller class does not have the functions drawOnMap or tacticalDrawOnMap.
Editing the code
In controller.h, add the following lines in the public section, below the other Q_INVOKABLEs:
// Called when pressing on a button for simple drawings (point, line or polygon)
Q_INVOKABLE void drawOnMap(QString drawingType);

// Called when pressing on a button meant to draw tactical symbols or graphics
Q_INVOKABLE void tacticalDrawOnMap(QString sidc);
In the private: section, below the other properties, add the following members:
// Initialization method for tools (standard and create).
void initializeTools();

// Standard tool and touchtool.
Carmenta::Engine::ToolPtr _standardTool;
Carmenta::Engine::TouchToolPtr _standardTouchTool;

// Create tool and touchtool.
Carmenta::Engine::ToolPtr _createTool;
Carmenta::Engine::TouchToolPtr _createTouchTool;

// Memory Dataset reference, store drawn features.
Carmenta::Engine::MemoryDataSetPtr _drawnObjectsMemDs;

Carmenta::Engine::CreateToolPtr _createTacticalTool;
Carmenta::Engine::CreateTouchToolPtr _createTacticalTouchTool;
Carmenta::Engine::MemoryDataSetPtr _tacticalDrawingsMemDs;

// Convenience method to set the standard tool on the map control.
void swapToStandardTool();

// Convenience method to set the create tool with designated create mode.
void swapToCreateTool(Carmenta::Engine::ToolCreateMode& mode, Carmenta::Engine::CreateToolParametersPtr toolParameters);

// Event handler for Carmenta event: featureCreated.
inline static void CARMENTA_ENGINE_STDCALL featureCreatedHandler(
    const Carmenta::Engine::EngineObjectPtr&,
    const Carmenta::Engine::FeatureCreatedEventArgs&,
    void* data)
{
    auto controller = static_cast<Controller*>(data);
    controller->swapToStandardTool();
}
We will include code for both tool (mouse interactions) and touchtool (touchscreen interactions), feel free to adapt this and remove the option you don’t need.
Lastly, the featureCreatedHandler method is called when a feature is created with the CreateTool or CreateTouchTool and will handle the swap back to the StandardTool. Check Supported Interactions of the documentation to learn more about feature creation.
In controller.cpp, below the other methods add the following:
void Controller::initializeTools()
{
// Declaration of the various 2D tools, including touch
_standardTool = new StandardTool();
_standardTouchTool = new StandardTouchTool();
_createTool = new CreateTool(_drawnObjectsMemDs);
_createTouchTool = new CreateTouchTool(_drawnObjectsMemDs);
// Adding the feature handler on the create tools
static_cast<CreateTool*>(_createTool.get())->addFeatureCreatedHandler(featureCreatedHandler, this);
static_cast<CreateTouchTool*>(_createTouchTool.get())->addFeatureCreatedHandler(featureCreatedHandler, this);
// Set the tools on the map control
mapControl->tool(_standardTool);
mapControl->touchTool(_standardTouchTool);
// Tactical create tool initialization: custom create mode and dedicated feature handler
_createTacticalTool = new CreateTool(_tacticalDrawingsMemDs);
_createTacticalTool->createMode(ToolCreateMode::ToolCreateModeCustom);
_createTacticalTool->addFeatureCreatedHandler(featureCreatedHandler, this);
// Tactical create touch tool initialization: custom create mode and dedicated feature handler
_createTacticalTouchTool = new CreateTouchTool(_tacticalDrawingsMemDs);
_createTacticalTouchTool->createMode(ToolCreateMode::ToolCreateModeCustom);
_createTacticalTouchTool->addFeatureCreatedHandler(featureCreatedHandler, this);
}
void Controller::swapToStandardTool()
{
mapControl->tool(_standardTool);
mapControl->touchTool(_standardTouchTool);
}
void Controller::swapToCreateTool(Carmenta::Engine::ToolCreateMode& mode, Carmenta::Engine::CreateToolParametersPtr toolParameters)
{
// Setting the correct mode on our create tool
static_cast<CreateTool*>(_createTool.get())->createMode(mode);
static_cast<CreateTool*>(_createTool.get())->parameters(toolParameters);
static_cast<CreateTouchTool*>(_createTouchTool.get())->createMode(mode);
static_cast<CreateTouchTool*>(_createTouchTool.get())->parameters(toolParameters);
// Setting the create tool on the map control
mapControl->tool(_createTool);
mapControl->touchTool(_createTouchTool);
}
void Controller::drawOnMap(QString drawingType)
{
// Deducing the correct create mode from the argument
ToolCreateMode createMode;
CreateToolParametersPtr parameters;
if (drawingType == "point")
{
createMode = ToolCreateMode::ToolCreateModePoint;
}
else if (drawingType == "line")
{
createMode = ToolCreateMode::ToolCreateModeLine;
}
else if (drawingType == "polygon")
{
createMode = ToolCreateMode::ToolCreateModePolygon;
}
else if (drawingType == "circle")
{
createMode = ToolCreateMode::ToolCreateModeEllipse;
auto ellipseParameters = new EllipseCreateToolParameters();
ellipseParameters->ellipseCreateMode(ToolEllipseCreateModeCircle);
parameters = ellipseParameters;
}
else
{
return;
}
// Setting the create mode on the tool and swapping it on the map control
swapToCreateTool(createMode, parameters);
}
void Controller::tacticalDrawOnMap(QString sidc)
{
String sidcString = sidc.toStdString().c_str();
_createTacticalTool->parameters(new MilStd2525CCreateToolParameters(sidcString));
_createTacticalTouchTool->parameters(new MilStd2525CCreateToolParameters(sidcString));
mapControl->tool(_createTacticalTool);
mapControl->touchTool(_createTacticalTouchTool);
}
To finish, we need to make sure our different members are initialized properly. In the Controller::initialize function, below loadConfiguration, add the following line to initialize the tools:
initializeTools();
The drawn feature will be added to a MemoryDataSet, in our case the member drawnObjectsMemDs. In the LoadConfiguration method before the end of the function, add the following to initialize the memory dataset found in the configuration file.
// Let's retrieve the memory datasets used to store our different drawings
_drawnObjectsMemDs = dynamic_cast<MemoryDataSet*>(mapControl->view()->findChildObject("DrawnObjectsMemoryDataSet").get());
_tacticalDrawingsMemDs = dynamic_cast<MemoryDataSet*>(mapControl->view()->findChildObject("TacticalDrawingsMemoryDataSet").get());
Notice that the names passed into the findChildObject function are the same as the one in the configuration file. If you changed the name of the MemoryDataSet before, update it here too.
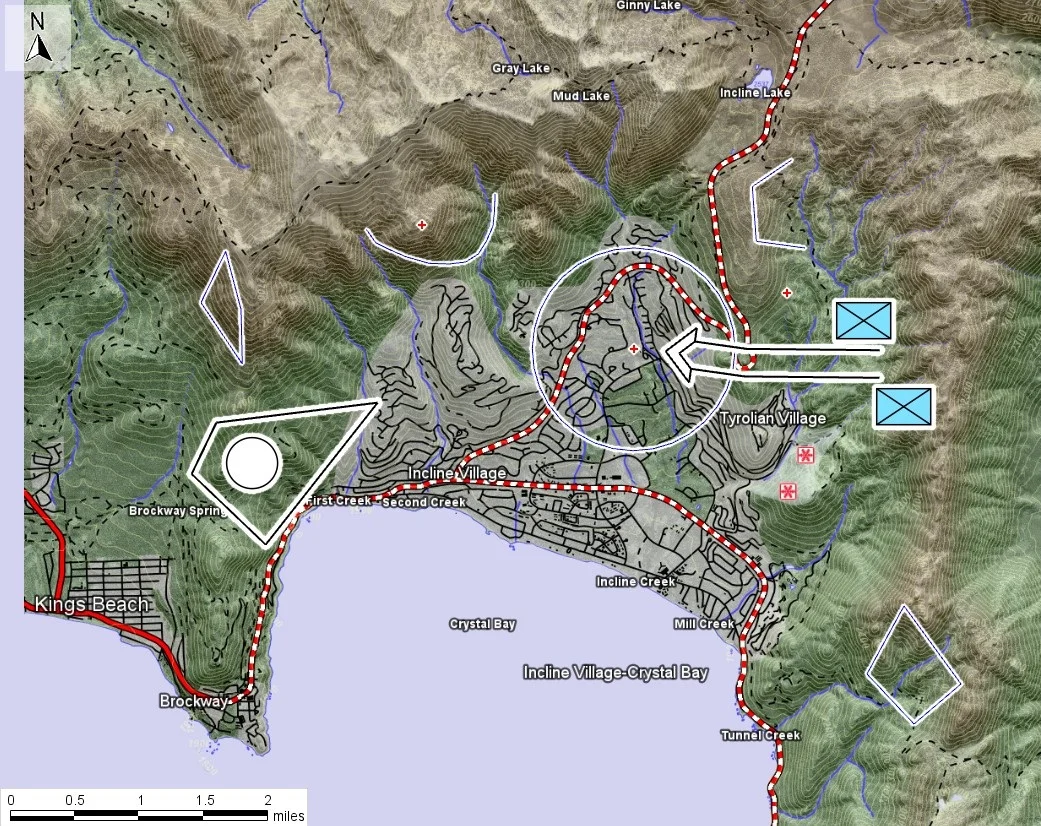
Now, the code needed to draw features on the map is complete. Starting the application, you can now draw features on the map: