Next Post
Using Carmenta Engine with the MVVM pattern
Explore how to apply the MVVM pattern in Carmenta Engine WPF apps. This guide walks through refactoring a sample project for better structure and maintainability.
View Post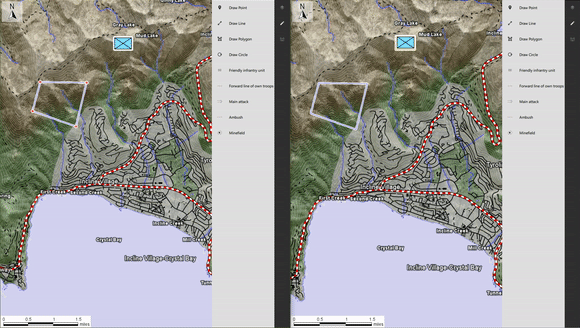
In this article, the final part in a series of three, our basic QtQuick application will be enhanced with a networking panel allowing it to connect to a remote server by entering an IP and port, and then allowing it to create and edit features, while broadcasting the changes to potential other connected clients.
As the application has grown larger, this article will be slightly different from the others in the series and will focus more on explaining important parts of the application rather than doing a step-by-step edit of the base project.
The application is structured into two different projects:
At the end of this article, this is what you will be able to do:
The changes from the previous articles are the following:

In this section, we will detail how the server and client components interact with one another.
In essence, our communications can be summarized as maintaining a shared MemoryDataSet across several applications, using GeoJSON as exchange format.

Upon pressing the connect button in the GUI, after setting an IP and port, the socket will connect to the listening server. In return, the server will return all features it currently holds to the connecting client.

When a user creates a Feature using the different tools available through the GUI, the FeatureCreated event is fired. In the event handler, the client serializes the created Feature and sends it to the server.

When a user edits a Feature using the standard tools, the FeatureInteractedHandler is triggered. In this handler, the client serializes the edited Feature to GeoJSON. The server updates its stored copy of the Feature based on its ID and then forwards the changes to other connected clients which are then able to update their local features.
Here, we choose to connect to tools’ events. It is also possible to connect directly to a MemoryDataSet‘s events, after setting its enableEvents property to
True. It is a bit more conventional, especially in applications where features can be modified in other ways than using tools. However, this design also needs to disable the events whenever the updates come from the server, in order to avoid infinite loops.
Note that at least two more use-cases could be necessary here but have not been implemented: handling server disconnection & handling feature removal.
Additionally, client disconnection is supported only in a basic way.
Our components communicate over TCP, using QTcpSocket & QTcpServer. The communication design takes some inspiration from here.
Features are sent between server and clients as GeoJSON strings.
The QtQuickServer console application is made of two classes. The server class is a wrapper around a QTcpServer and handles listening on a port, receiving and sending messages, as well as keeping a list of connected clients as a list of socket addresses. The backend class is connected to server signals and adds handling to the different messages as well as broadcasting any changes.
The QtQuickClient has been extended with a client class which is a wrapper around a QTcpSocket. It connects to an IP and port & can send and receive messages. It is then connected to the controller class through slots and signals to synchronize the shared MemoryDataSet state with the server and across other connected clients.
With Carmenta Engine 5.16, it is possible to natively read GeoJSON, making it easier to exchange features on this format. The main serialization and de-serialization work is done in the GeoJSON class directly, namely the GeoJSON::toString & GeoJSON::fromString methods.
More information on the GeoJSON specification.
We can see in the QML for the networking panel that the client is connected to the panel, directly setting the IP (client.host) and port (client.port). We also ensure that the IP is properly formatted using a regular expression.
Item {
    Column
    {
        Row
        {
            spacing: 2
            leftPadding: 4
            rightPadding: 4
            bottomPadding: 4
            topPadding: 4
            Text {
                text: "IP: "
                verticalAlignment: Text.AlignVCenter
                anchors.verticalCenter: ipTextField.verticalCenter
                width: 40
            }
            TextField {
                id: ipTextField
                width: 150
                validator: RegularExpressionValidator {
                    regularExpression: /^((?:[0-1]?[0-9]?[0-9]|2[0-4][0-9]|25[0-5]).){0,3}(?:[0-1]?[0-9]?[0-9]|2[0-4][0-9]|25[0-5])$/
                }
                text: client.host

                onEditingFinished : {
                    client.host = text
                }
            }
        }

        Row
        {
            id: portRow
            spacing: 2
            leftPadding: 4
            rightPadding: 4
            bottomPadding: 4
            Text {
                text: "Port: "
                verticalAlignment: Text.AlignVCenter
                anchors.verticalCenter: portTextField.verticalCenter
                width: 40
            }
            TextField {
                id: portTextField
                text: client.port
                width: 150
                inputMethodHints: Qt.ImhDigitsOnly

                onEditingFinished : {
                    client.port = text
                }
            }
        }

        RowLayout
        {
            width: parent.width
            Button {
               id: btn_connect
               Layout.preferredWidth: 80
               Layout.leftMargin: 4
               Layout.topMargin: 6
                text: "Connect"
               background: Rectangle {
                   color: parent.enabled ? parent.down ? "#78C37F" : "#87DB8D" : "gray"
                   border.color: "#78C37F"
               }

               onClicked: {
                   client.onConnectClicked();
                   this.enabled = false;
               }
           }

           Button {
               id: btn_disconnect
               enabled: !btn_connect.enabled
               Layout.alignment: Qt.AlignRight
               Layout.rightMargin: 4
               Layout.topMargin: 6
               text: "Disconnect"
               Layout.preferredWidth: 80
               background: Rectangle {
                   color: parent.enabled ? parent.down ? "#DB7A74" : "#FF7E79" : "gray"
                   border.color: "#DB7A74"
               }
               onClicked: {
                   client.closeConnection();
                   btn_connect.enabled = true;
               }
           }
       }
   }
}
In order to be available from the QML, the client class is registered as a context property in the main.cpp file. We also take this opportunity to connect signals and slots between the controller and the client. The IP and port are exposed as Q_PROPERTY, and we will have a closer look at the implementation for the connection and disconnection in the following sections. In main.cpp:
Client client{};
ctxt->setContextProperty("client", &client);
QObject::connect(&Controller::instance(), &Controller::featureInserted, &client, &Client::pushMessageToServer);
QObject::connect(&Controller::instance(), &Controller::featureChanged, &client, &Client::pushMessageToServer);
QObject::connect(&client, &Client::messageReceived, &Controller::instance(), &Controller::onFeaturesReceived);
Finally, before moving on, let’s have a look at the resulting panel:

A client connects to a server by setting an IP and port and pressing the Connect button. The client application then sends a connection request through its socket and if the server is listening on the designated IP and port, it will reply with a list of existing features. If the server is not available, the connection will fail. In client.cpp:
void Client::onConnectClicked()
{
    _socket.connectToHost(host, port);
    connect(&_socket, &QTcpSocket::readyRead, this, &Client::onReadyRead);
}
Upon pressing the button, the code above is executed. The socket connects to the host and we bind a slot to the socket’s readyRead() signal. This allows us to read incoming messages. The readyRead() signal is emitted every time a new chunk of data has arrived. bytesAvailable() then returns the number of bytes that are available for reading.
A message can thus be read in the following way, where onReadyRead() is a slot connected to readyRead() in client.cpp:
void Client::onReadyRead()
{
    QDataStream in(&_socket);
    for (;;)
    {
        if (!m_nNextBlockSize)
        {
            if (_socket.bytesAvailable() < sizeof(quint16)) { break; }
            in >> m_nNextBlockSize;
        }

        if (_socket.bytesAvailable() < m_nNextBlockSize) { break; }

        QString str; in >> str;

        if (str == "0")
        {
            str = "Connection closed";
            closeConnection();
        }
        emit messageReceived(str); // for handling by the application
        m_nNextBlockSize = 0;
    }
}
Conversely, it is possible to send message through the socket in the following way:
void Client::pushMessageToServer(QString msg)
{
    if (_socket.state() != QAbstractSocket::ConnectedState) return;
    QByteArray arrBlock;
    QDataStream out(&arrBlock, QIODevice::WriteOnly);
    out << quint16(0) << msg;

    out.device()->seek(0);
    out << quint16(arrBlock.size() - sizeof(quint16));

    _socket.write(arrBlock);
}
Finally, in order for the connection to be established, the server needs to be listening on a given IP address and port and it also needs to accept the incoming connection request and add the socket to a list of clients. This is done in the following way in server.cpp:
void Server::startListening()
{
    if (!_tcpServer.listen(QHostAddress::Any, 6547))
    {
       qDebug() << "Error! The port is taken by some other service";
    }
    else
    {
        connect(&_tcpServer, &QTcpServer::newConnection, this, &Server::onNewConnection);
    }
}

void Server::onNewConnection()
{
    QTcpSocket* clientSocket = _tcpServer.nextPendingConnection();

    connect(clientSocket, &QTcpSocket::disconnected, clientSocket, &QTcpSocket::deleteLater);
    connect(clientSocket, &QTcpSocket::readyRead, this, &Server::readClient);
    connect(clientSocket, &QTcpSocket::disconnected, this, &Server::onDisconnected);

    _connectedClients << clientSocket;

    emit clientConnected(clientSocket);
}
Our server handles two different types of interaction:
Below is how our server notifies connecting clients of existing features in backend.cpp:
void Backend::onClientConnected(QTcpSocket* clientSocket)
{
    // Send all feature to connecting client
    qDebug() << "Client connected";

    // Collect all cached Features
    auto features = _dataSet->getFeatures();

    FeatureCollectionPtr feats = new FeatureCollection();
    while(features->moveNext())
    {
        auto feature = features->current();
        feats->add(features->current());
    }

    // send them to client
    if (feats->size() > 0)
    {
        // serialize Feautres as GeoJSON
        QString json = QString(Carmenta::Engine::GeoJSON::toString(feats, false).c_str());
        _server.pushToClient(clientSocket, json);
    }
}
And upon receiving a message, the server tries to parse it as a GeoJSON Feature and handles it appropriately.
void Backend::onNewMessage(QTcpSocket* client, QString msg)
{
    //handle message here
    try
    {
        auto features = Carmenta::Engine::GeoJSON::fromString(msg.toStdString().c_str());
        for(auto feature = features->begin(); feature != features->end(); ++feature)
        {
            FeaturePtr f = *feature;

            // get feature quuid
            std::string featId = getAttributeValueString(f->attributes(), "geojson_id", "");
            QUuid uuid = QUuid::fromString(QString(featId.c_str()));

            // Existing feature received, update the cache first
            if (_cache.contains(uuid))
            {
                auto localFeature = _cache[uuid];

                _dataSet->remove(localFeature->id());
            }

            _dataSet->insert(f);
            _cache[uuid] = f;
        }

        // Broadcast the feature update/insertion to other clients
        _server.broadcastToClients(msg, client);
    }
    catch (...)
    {
        qDebug() << "an error occured processing : " << msg;
    }
}
Our client can both send messages after triggering tools’ events as well as receive messages from our server.
The controller contains the implementations of tool event handlers. The typical flow is to receive the event, serialize the feature contained in the event argument and push the message to server. In controller.cpp:
void Controller::featureCreatedHandler(
    const Carmenta::Engine::EngineObjectPtr&,
    const Carmenta::Engine::FeatureCreatedEventArgs& e,
    void* data)
{
    auto controller = static_cast<Controller*>(data);
    controller->swapToStandardTool();

    // Add feature to our local cache
    auto localFeature = e.feature();

    std::string featId = getAttributeValueString(e.feature()->attributes(), "geojson_id", "");
    QUuid uuid = QUuid::fromString(QString(featId.c_str()));
    controller->_cache.insert(uuid, localFeature);

    // Serialize created feature
    auto featureCollection = new Carmenta::Engine::FeatureCollection();
    featureCollection->add(localFeature);
    auto geojsonF = Carmenta::Engine::GeoJSON::toString(featureCollection, false);

    // Emit signal that will push serialized feature to server
    emit controller->featureInserted(QString(geojsonF.c_str()));
}

void Controller::featureInteractedHandler(
    const EngineObjectPtr&,
    const InteractedEventArgs& e,
    void* data
)
{
    auto controller = static_cast<Controller*>(data);

    // Convert features to geoJSON
    auto geojsonFeature = GeoJSON::toString(e.features(), false);

    // Emit signal that will push serialized feature to server
    emit controller->featureChanged(QString(geojsonFeature.c_str()));
}
In order to avoid duplicate features between clients we tag each feature created with a unique id. For our sample, we use QUuid::createUuid() from the Qt API to create a unique id for us. Our createTools are updated so each time we call them a new QUuid is created:
void Controller::swapToCreateTool(Carmenta::Engine::ToolCreateMode& mode, Carmenta::Engine::CreateToolParametersPtr toolParameters)
{
    // Setting the correct mode on our create tool
    static_cast<CreateTool*>(_createTool.get())->createMode(mode);
    static_cast<CreateTool*>(_createTool.get())->parameters(toolParameters);
    static_cast<CreateTool*>(_createTool.get())->attributes()->set("geojson_id", QUuid::createUuid().toString().toStdString().c_str());
    static_cast<CreateTouchTool*>(_createTouchTool.get())->createMode(mode);
    static_cast<CreateTouchTool*>(_createTouchTool.get())->parameters(toolParameters);
    static_cast<CreateTouchTool*>(_createTouchTool.get())->attributes()->set("geojson_id", QUuid::createUuid().toString().toStdString().c_str());

    // Setting the create tool on the map control
    mapControl->tool(_createTool);
    mapControl->touchTool(_createTouchTool);
}

void Controller::tacticalDrawOnMap(QString sidc)
{
    String sidcString = sidc.toStdString().c_str();
    _createTacticalTool->parameters(new MilStd2525CCreateToolParameters(sidcString));
    _createTacticalTool->attributes()->set("geojson_id", QUuid::createUuid().toString().toStdString().c_str());
    _createTacticalTouchTool->parameters(new MilStd2525CCreateToolParameters(sidcString));
    _createTacticalTouchTool->attributes()->set("geojson_id", QUuid::createUuid().toString().toStdString().c_str());

    mapControl->tool(_createTacticalTool);
    mapControl->touchTool(_createTacticalTouchTool);
}
The other client-server interaction is the ability to receive messages. The client can parse the message argument and convert it to features. Each feature’s geojson_id is tested so we avoid generating duplicate features.
void Controller::onFeaturesReceived(QString message)
{
    auto featureCollection = Carmenta::Engine::GeoJSON::fromString(message.toStdString().c_str());

    for(auto feature = featureCollection->begin(); feature != featureCollection->end(); ++feature)
    {
        FeaturePtr f = *feature;

        // get feature quuid
        std::string featId = getAttributeValueString(f->attributes(), "geojson_id", "");
        QUuid uuid = QUuid::fromString(QString(featId.c_str()));

        // check if we have a sidc (a tactical symbol)
        std::string sidc = getAttributeValueString(f->attributes(), "sidc", "");
        if (sidc != "")
        {
            UpdateCache(uuid, f, _tacticalDrawingsMemDs);
        }
        else
        {
            UpdateCache(uuid, f, _drawnObjectsMemDs);
        }
    }

    mapControl->updateView();
}

void Controller::UpdateCache(QUuid uuid, Carmenta::Engine::FeaturePtr feature, Carmenta::Engine::MemoryDataSetPtr dataset)
{
    if (_cache.contains(uuid))
    {
        Guard g(dataset);
        auto localFeature = _cache[uuid];
        dataset->remove(localFeature->id());
    }

    Guard g(dataset);
    dataset->insert(feature);
    _cache[uuid] = feature;

    dataset->refreshFeaturePresentation(feature, false);
}
And that’s it! We can now connect several clients to a server and have them communicate and synchronize.
As you may have noticed by now, we have extended our QtQuickSample to handle communication via TCP sockets between several instances.
It is of course not a fully functional server/client implementation as some use-cases are missing, which we detail right below. The actual information exchange is also quite simplified.
Although simple, this extension of the sample gives some insight about the way Carmenta Engine-based applications can communicate geospatial information in a networked environment.
In case you are interested in geospatial servers, it would make a lot of sense to check out the following:
A few other interesting things about this example:
All that remains now is to wish you good luck in developing applications using Carmenta Engine and QtQuick!
Explore how to apply the MVVM pattern in Carmenta Engine WPF apps. This guide walks through refactoring a sample project for better structure and maintainability.
View Post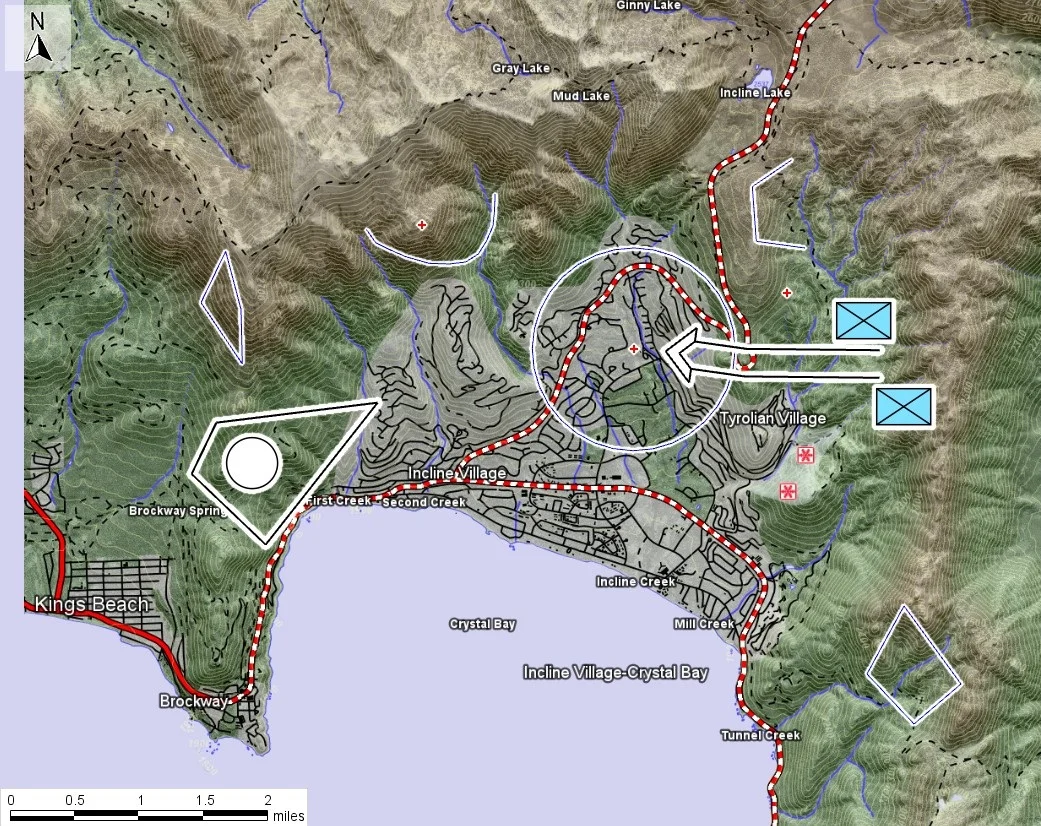
In this tutorial, we will add a DrawControl to the application allowing users to add tactical symbols as well as basic shapes to the map.
View Post