Next Post
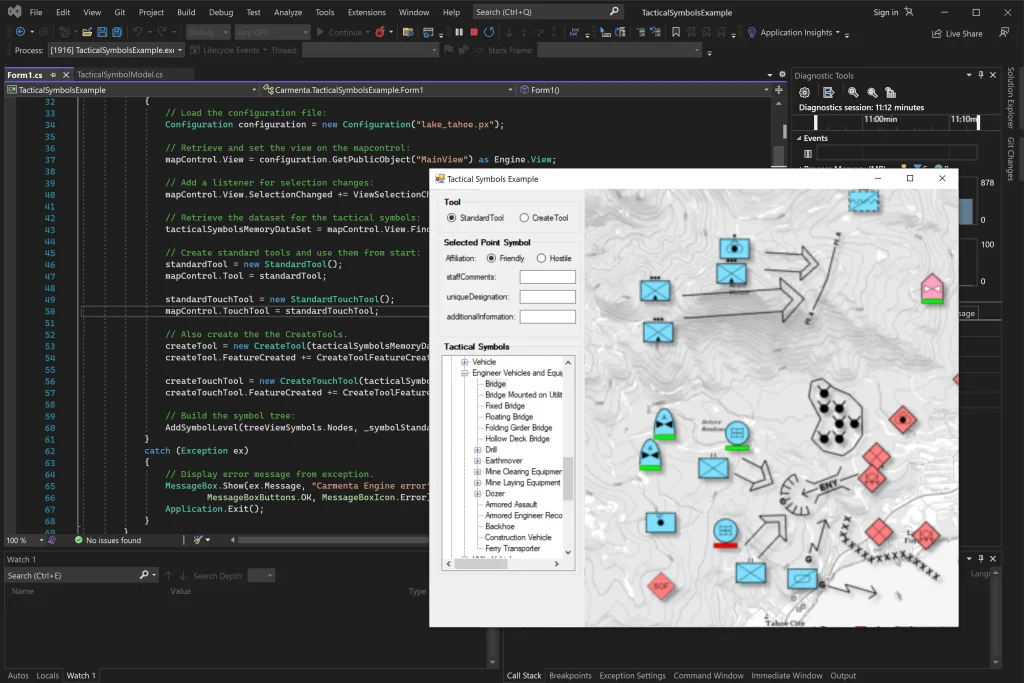
Getting started with the tactical symbology in Carmenta Engine
Get started with how to display and edit tactical symbols in Carmenta Engine using MIL-STD-2525 and NATO App-6 standards.
View Post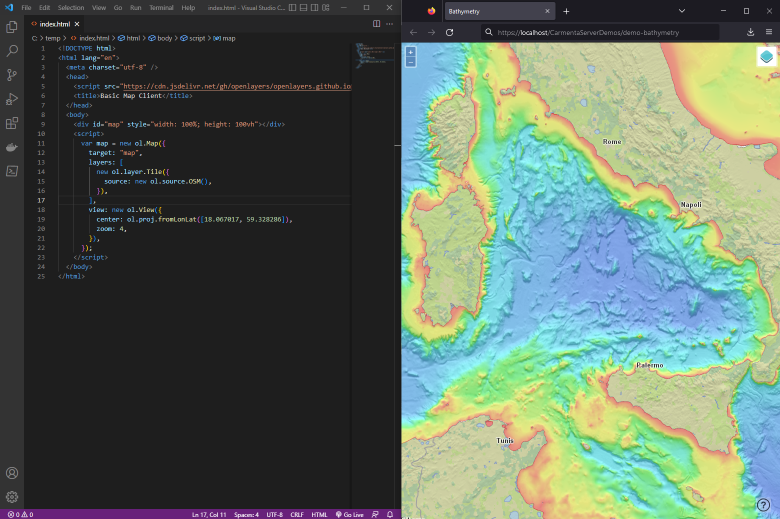
There are plenty of options for providing and consuming geographical data in an application and the choice of programming language, framework or software will depend on a large set of factors; will it be a mobile or desktop application? Will the application be constrained to run on limited hardware resources? Maybe there are strict requirements in terms of security that will require full control of application dependencies. Other factors such as existing knowledge within a development team or company or the application area might also affect the choice.However, it’s undeniable that developing towards a web platform is a popular choice. With the vast amount of available frameworks and the widening set of capabilities of web applications such as accessing native functionality of the client device and doing client-side development using programming languages typically not used for web applications by targeting WebAssembly, this trend will most likely continue.
To briefly explore what we discussed, we will during the scope of this article develop a simple static web site using the popular open source JavaScript library OpenLayers. We will then use Carmenta Server to publish an OGC® compliant map service and consume this in our client application. After reading this article and following along you should have some more information regarding the following:
To follow along with this tutorial you will need the following on your development environment:
The remainder of this article will use Visual Studio Code for the client but any code editor will work.
Let’s create a simple client application using the popular open source library OpenLayers. With this library we will be able to consume OGC compliant map services published by Carmenta Server without having to write much client-side code.
Start by creating a new project folder for the client application by creating a new directory map-client. Using PowerShell you can type the following to create a new directory and open it in Visual Studio Code:
New-Item -Type Directory map-client
code map-client
With the project folder open in Visual Studio Code, let’s create the basic index page index.html in project directory root with the following content:
<!DOCTYPE html>
<html lang="en">
  <meta charset="utf-8" />
  <head>
    <title>Basic Map Client</title>
  </head>
  <body>
    <p>Map Client goes here!</p>
  </body>
</html>
This will be that basic html structure we will extend with OpenLayers by adding the OpenLayers library from a Content Delivery Network. Add the following script tag to index.html in the head tag:
...
  <head>
    <script src="https://cdn.jsdelivr.net/gh/openlayers/openlayers.github.io@master/en/v6.9.0/build/ol.js"></script>
    <title>Basic Map Client</title>
  </head>
  ...
Now let’s add the OpenLayers ol.Map component to the page. To do this we create a html div element with an id attribute that will be identified by the OpenLayers package to display the map component. We add some inline css to make the div cover the entire page and then initiate the map component inside of a script tag. Add the following to the body tag in index.html:
...
<body>
    <div id="map" style="width: 100%; height: 100vh;"></div>
    <script>
    var map = new ol.Map({
        target: "map",
        layers: [
            new ol.layer.Tile({
                source: new ol.source.OSM()
            })
        ],
        view: new ol.View({
            center: ol.proj.fromLonLat([18.067017, 59.328286]),
            zoom: 4
        })
    })
    </script>
</body>
...
The script creates a new ol.Map instance in the target div with a new ol.source.OSM layer that will provide OpenStreetMap map tiles. We also initiate the view property with a new ol.View, which gives us a 2D view with default map interactions and a set of properties for managing map state, such as zoom level, rotation, resolution etc.
The final index.html should look something like this:
<!DOCTYPE html>
<html lang="en">
  <meta charset="utf-8" />
  <head>
    <script src="https://cdn.jsdelivr.net/gh/openlayers/openlayers.github.io@master/en/v6.9.0/build/ol.js"></script>
    <title>Basic Map Client</title>
  </head>
  <body>
    <div id="map" style="width: 100%; height: 100vh"></div>
    <script>
      var map = new ol.Map({
        target: "map",
        layers: [
          new ol.layer.Tile({
            source: new ol.source.OSM(),
          }),
        ],
        view: new ol.View({
          center: ol.proj.fromLonLat([18.067017, 59.328286]),
          zoom: 4,
        }),
      });
    </script>
  </body>
</html>
Upon opening index.html in a browser you should see a map covering the entire page.
The next step in our development is to add a new layer to our map application where the source is a map service which is published with Carmenta Server. Consuming a map service from Carmenta Server gives you complete control over the data, visualization and which service interfaces your map data should be exposed through. It could be map tiles over WMTS or WMS, vector data over WFS or Vector Tiles or even detailed 3D data over 3D Tiles. The different available publishing options should cover most use-cases for supplying a business-critical application with geographical data, with plenty of room for customization.
By publishing OGC compliant services or de-facto standard interfaces such as Vector Tiles you can be sure that interoperability is supported out of the box, thus giving many possible client-side options for consuming map services, such as Carmenta Engine, OpenLayers, Leaflet and many more.
This section will assume you’ve installed a Carmenta Server instance locally on your development machine and that you have access to the administration web interface.
Visit the url http://localhost/CSAdmin4/ to access the administration login page. Login using the login information that was specified during setup and you should be redirected to the services list with an overview of the available services and related information such as their publishing status and available service interfaces. The below picture shows an example service list with a couple of services published:

By selecting a service in the list, you can get further information about that particular service in the panel on the left, such as the available services interfaces which are marked with a bold text and the links to the capabilities document and the service interface endpoint and many more options which go beyond the scope of this article.
Note: if you have a default installation of Carmenta Server without any previous configuration done you will likely only have the example service Partial Vmap0 Sample available in the service list.
Let’s extend our client application with a new map layer by specifying a new source coming from Carmenta Server. In the client code we want to replace the current layer with a new ol.layer.Image layer which in turn should use a ol.source.ImageWMS source. We do this by creating these and specifying a few necessary properties. Replace the contents of the ol.Map.layers property with the following:
...
layers: [
  new ol.layer.Image({
    source: new ol.source.ImageWMS({
      url: "http://localhost/MapService/wms.axd/vmap0",
      params: {
        LAYERS: ["Land", "Cities", "Bounds", "Coastlines"]
      }
    })
  })
],
...
A few things need explanation here; let’s start with the OpenLayers types involved. The ol.layer.Image layer handles server-rendered, geo-referenced images of arbitrary extent and resolution. We connect this layer with a source of type ol.source.ImageWMS which manages the querying and receiving responses from an OGC WMS HTTP service endpoint, which, in turn, will provide us these particular geo-referenced images. The ol.source.ImageWMS source must be configured with a url property which tells where to start looking for the capabilities document where the service-specific capabilities can be parsed by consumers of the service. We must also supply an array of layers in the ol.source.ImageWMS.params property. The layers specified in this case come from the WMS capabilities document which can be accessed at http://localhost/MapService/wms.axd/vmap0?Service=WMS&request=GetCapabilities for our current service.
Naturally, in a production-ready application one would not specify map sources in a static manner like this. Many client-side libraries and SDKs comes with functionality for automatically retrieving the available layers per service and even entire service catalogs, so that entire sets of services and their respective service interfaces can be dynamically detected by consuming applications. This is supported by Carmenta Server and Carmenta Engine with the Catalog Service for the Web (CSW) standard.
To be able to create a richer user experience you might also want to use third-party libraries and frameworks such as Angular or React. This will put further requirements on the development environment and might be a topic for a future article.
Get started with how to display and edit tactical symbols in Carmenta Engine using MIL-STD-2525 and NATO App-6 standards.
View Post