Next Post
QtQuick Map Application (Part 1) : Adding a Layer Control
In this tutorial, the first part in a series of three, you will learn how to modify the existing QtQuick sample and add a LayerControl to it.
View Post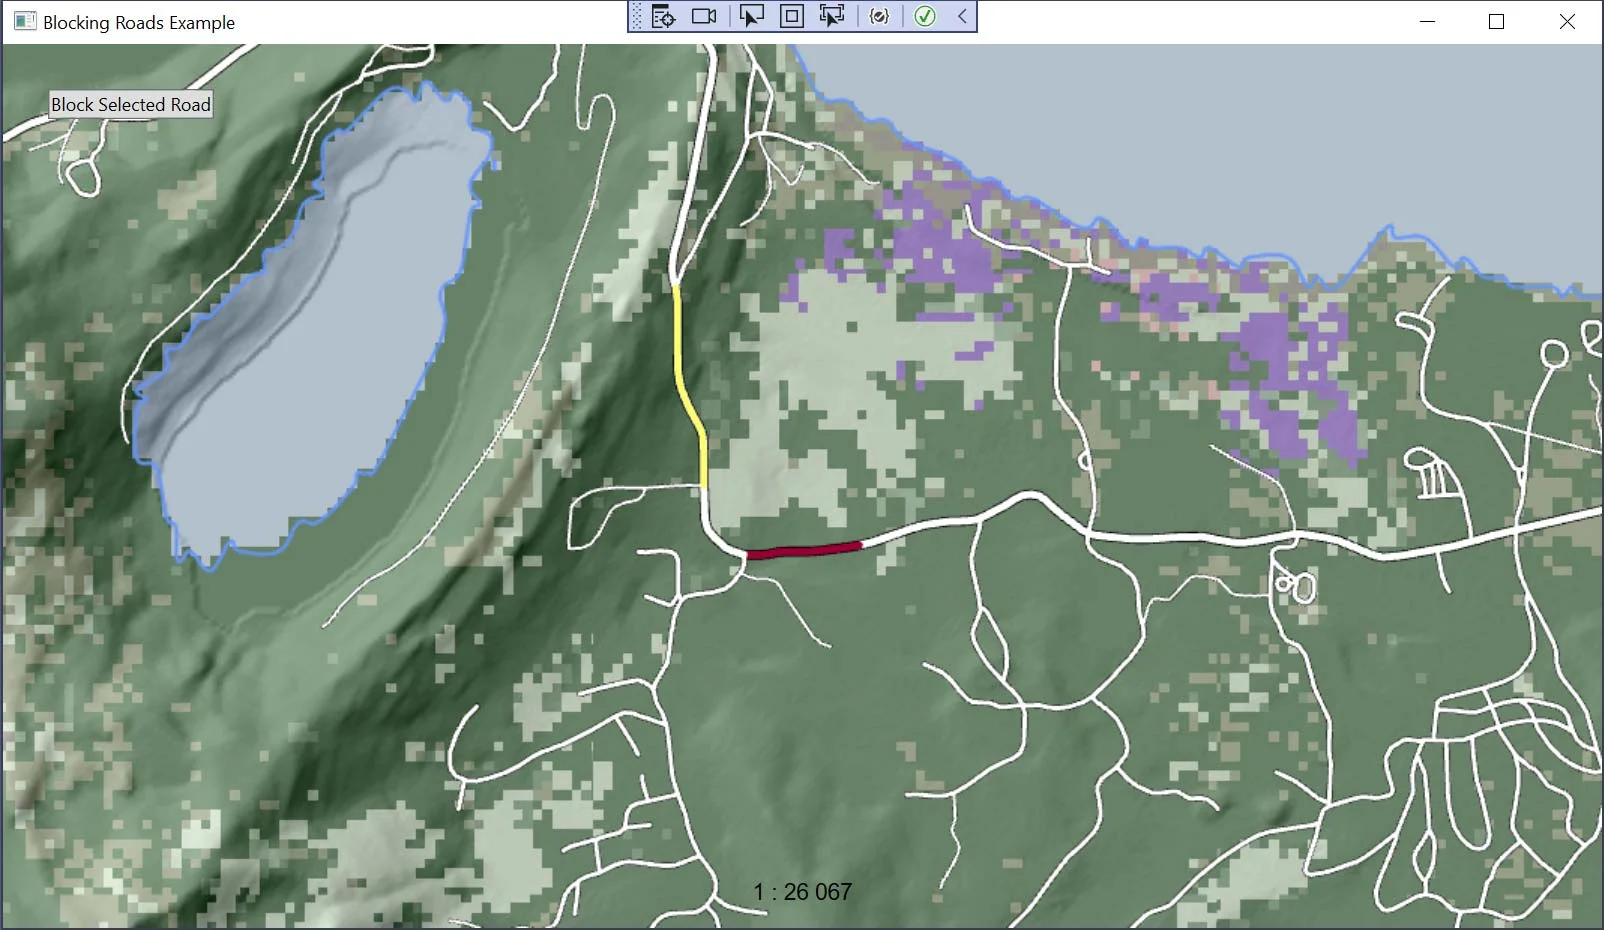
When using Carmenta Engine, there are times in which you want to be more specific about your visualization. Perhaps your visualization is only suitable for certain type of observers, at certain zoom levels or at certain times of the day. These are what we refer to as dynamical runtime condition variables. They exist as a set of UpdateAttributes inside the View class. There is a set of predefined variables but it’s also possible to add custom variables.
For more detail, please read the technical reference on update attributes inside the Carmenta Engine SDK documentation.
We will be looking at three different use-cases. First, we will use the predefined variables to visualize attributes only within a specific scale range. Second, we will add our own custom variable to visualize symbols depending on what team you are on. And finally, the last example is a code-based scenario. In this scenario we will read features from a shapefile visualizing a road network. We shall then implement logic to change the visualization of a subset of these road lines and highlight these as blocked off roads. We will see in this scenario how helpful update attributes can be when dealing with raw data. It is not advisable to edit raw data when dealing with shapefiles to change attributes. Instead, mixing existing feature attributes and update attributes could be a better solution.
The configurations and code for the three examples can be downloaded here.
We begin with a very slim Carmenta Engine configuration file, ViewUpdateAttribute1.px.
![]()
This configuration consists of a single layer, the SymbolLayer. As the name suggests, we have a MemoryDataSet with a single point feature that is visualized using SymbolVisualizer0. However, this symbol is only suitable within a specific zoom range. If we zoom out too far, our symbol is simply in the way, and if we zoom in too much, our symbol is no longer appropriate to the overall map.
To do this, we create a condition on SymbolVisualizer0, name it Condition0. To access the predefined update attributes, press on the drop-down menu named “Insert Attribute…”. The list showcases all predefined update attributes as well as the attributes found on the features. We wish to use the current zoom level as a variable so we select the one called updateViewScale. To understand what all the predefined variables do, please have a look inside our Carmenta Engine SDK Documentation.

Let’s say that the top scale should be 10000 and our bottom scale should be 5000. Our final expression becomes “updateViewScale < 10000 and updateViewScale > 5000”. If you need further details regarding syntax, read the more about conditions in the Carmenta Engine SDK documentation. From Carmenta Studio, you can click on the blue title “Condition” (see image above) which will redirect you to the correct page of the documentation.
Launch the configuration using Carmenta Explorer and see how our symbol disappears and reappears whenever we are within the correct zoom level. Don’t be afraid to play around with different condition statements or the other predefined update attributes.
When visualizing symbols and tactical data on a map, it can sometimes be user/client specific information. A person handling logistic could need a set of symbols visualized while a tactical operator would need another set of symbols visualized over the same region of interest. In this example we will pretend to generate two sets of visualization that is team dependent (Red vs Blue). We have a set of symbols that appears in red and another that appears in blue. Now, if the user belongs to either of the teams, only the appropriate symbols of corresponding color should appear on screen. Thereby, we need a way of setting up the relevant conditions and changing between teams during runtime. Seems like the perfect job for our update attributes. Have a look at configuration file ViewUpdateAttribute2.px.

We have two different layers attached to our map, RedLayer and BlueLayer. Just like in example 1, we have a point feature visualized using a symbol visualizer in both layers. However, we have run into a problem here. None of the predefined update attributes is applicable to our use cases. It seems as if the only solution here would be to turn one layer off or on depending on the team in play. But all hope is not lost. We can declare our very own update attributes. Inside our View0, we add a new attribute to our list of UpdateAttributes. We give it the name “Team”, type String and the value “Blue”. The value can change as we will see later, leave it as “Blue” for now. Now we have our very own “global” attribute, that does not exist inside of any specific dataset nor feature. Let’s now use this attribute as a condition on the symbol visualizers. On RedLayer we check if “Team = “Red”” and on BlueLayer we check if “Team = “Blue””. Make sure to use citation on the value “Red” and “Blue” as they are said to be strings.
Run the configuration file using Carmenta Explorer. You should see a blue symbol visualized to the right of the center screen. Close the configuration file. Go to View0 and change the value of the Team Attribute to “Red” and restart the configuration file. Now we should see a red symbol to the left. Keep in mind that from code, we can change either the conditions as well as the View.UpdateAttributes in runtime. However, as we will see in the next example, to access and change update attributes from code we need to make sure that we do this from the GUI thread.
This example will be a coding example in C# WPF. We won’t dig too much into detail regarding the complete code, and instead focus on code that adds and modifies update attributes from code.
The scenario is as follows: We load features from a shapefile. They represent lines expressing a road network. We wish to implement functionality that allows the user to select a road and then block it. The blocked road will appear as red on the map.
To do this, it would be nice if we could somehow modify the features and attach a new Boolean attribute to them, Blocked. Then we can create a visualization that either draws white or red lines depending on the value of Blocked. However, we don’t really have access to the raw features inside of the shapefile. ShapefileDataSet work differently from MemoryDataSet. For MemoryDataSet, we generate application data that can be modified as we wish. With ShapefileDataSet we read shapefiles and pass a copy of this directly to the Carmenta Engine View object. What we can do is assign attributes to the copy of the features received from the dataset using AttributeOperator. By storing the reference of the currently selected feature, we can assign the attribute Blocked to it. Although, we need to store the references of all the features that we have blocked. We need a method to identify each individual road, store the blocked ones, and be able to update this list continuously during runtime. This sounds like a job for an update attribute.
First, we load our shapefile into Carmenta Explorer. This is a great way to study the raw geodata. By selecting some road lines in Carmenta Explorer we can get a list of its attributes. We wish to assign the new attribute “Blocked” to a selected feature in some coherent way. As we look through the list of features in our map, we can note the distinct attribute recno. This recno number is unique for each road and can be great use for us to identify each road without using the raw featureId.

This will be our game plan: Identify each road using the recno attribute, store the relevant recno values (the roads that should be blocked) in a list and use this recno list to assign the Blocked attribute. Although, how should we construct our list of recno numbers? Easy, it will be a custom update attribute.
On our View, we create a new string update attribute called Recnos. This string will contain a list of all of the recno values that should be blocked using comma separation. Inside of the AttributeOperator we write, “contains(Recnos, string(recno), true)”. The recno number is the incoming feature and Recnos is the custom update attribute. Here we see an example where you can mix feature attributes and custom update attributes inside a condition.
Please have a look at configuration file map.px inside the code example. This configuration file is setup according to the game plan we defined above. The RoadsTileLayer have two line-visualizers, one for blocked and unblocked roads. It has an AttributeOperator to insert the Blocked attribute. View0 is set up with the Recnos uppdate attribute. The configuration work is done, now we need code to handle the update attribute Recnos.

Open the code example project in your preferred IDE. As mentioned above, we will not have time to discuss the broad implementation. Instead, we will focus our attention to ViewModels/Map/RoadViewModel.cs. This VM (View-Model) handles the necessary logic to update the UpdateAttribute Recnos that we implemented above.
/// <summary>
/// Constructor
/// </summary>
/// <param name="effectsModel">Dependency injected effects model</param>
public RoadViewModel(IMapModel mapModel)
{
    _mapModel = mapModel;
    BlockRoadClickEvent = new RelayCommand(BlockRoadClickEventHandler);
    _recnoList = new List<string>();

    _mapModel.View.SelectionChanged += OnSelectionChanged;
    _roadsLayer = _mapModel.View.FindChildObject("RoadsLayer") as Layer;
}
In the constructor, we store the MapModel, initialize a string list recnoList, initialize the button command BlockRoadClickEvent, adds a listener to the selection changed event from our View and finally store a reference to our RoadsLayer. The MapModel contains the View which we have received from the Map.px configuration file. In MVVM pattern, we don’t directly implement button commands in the code-behind file. Instead, we use a RelayCommand to implement the listener inside the ViewModel.
The OnSelectionChanged handler is important, every time we click on a line/road using the map control, we wish to update the currently selected feature reference. To retrieve the feature, use its featureId and datasetId. We will not support multi selection.
private void OnSelectionChanged(object sender, EventArgs e)
{
    if (_mapModel.View.GetSelectedIds().Count != 1)
    {
        return;
    }

    Id id = new Id(
            _mapModel.View.GetSelectedIds()[0].DataSetId,
            _mapModel.View.GetSelectedIds()[0].FeatureId);

    DataSet ds = DataSet.GetDataSetById(id.DataSetId);

    if (ds == null)
    {
        return;
    }

    _selectedFeature = ds.GetFeature(id);
}
Now we arrive at the main implementation, the button. If the user has selected a road, then we shall now block it off by applying the Blocked Boolean attribute. If we remember from the px-file, to do this we need to add the recno number from the feature to the list of recno numbers in Recnos, which is the custom update attribute we set on the View.
private void BlockRoadClickEventHandler()
{
    if (_selectedFeature != null &&
        _selectedFeature.Attributes.TryGetValue(_recnoAtom, out AttributeValue recnoAttr) &&
        recnoAttr.TryGetValue(out int recno) &&
        recno > 0)
    {
        _recnoList.Add(recno.ToString());

        UpdateRecnos();

        ReselectFeature();

        return;
    }
}
We check if we have a selected feature and if the feature has a recno number and if so, we add it to our recnoList. Then we must update the Recnos update attribute.
private void UpdateRecnos()
{
    _mapModel.View.UpdateAttributes[_recnosAtom] = createRecnosString();

    _roadsLayer.FlushCache();
    _mapModel.View.Update();
}

private string createRecnosString()
{
    string ret = "";

    foreach (string recno in _recnoList)
    {
        ret += recno + ",";
    }

    return ret;
}
To update Recnos, we access the View from the MapModel and set a new value for the update attribute. The new value will be a comma separated list of all recno numbers inside recnoList. Since we are using a TileLayer we need to call the FlushCache method followed by the standard View.Update().
One important requirement for UpdateAttributes is that they can only be accessed from the GUI thread. You can perform calculations and lookup using background threads prior to updating or inserting new update attributes. Although, any operation directly involving UpdateAttributes and its underlying AttributeSet must be done from the GUI thread as noted in the documentation.
We have now gone through the important part of the code example. Let’s run the application. The example application is 64-bit based. We can start by panning around the map using the map control. The region visualized is Lake Tahoe, Sierra Nevada USA. If we select a line/road we notice that it shines a bright yellow color. In the top right corner we find the button to block off a road. If we select it, our road turns orange. This is because we mix the red blocked color and the yellow selected color. If I select another line nearby the blocked road will be visualized in a bright red color. That is all for this application example.
In this tutorial, the first part in a series of three, you will learn how to modify the existing QtQuick sample and add a LayerControl to it.
View Post
Find out how to develop OGC-compliant map services with Carmenta Server Core and deploy them on Microsoft Azure App Service using containerized workflows.
View Post