Next Post
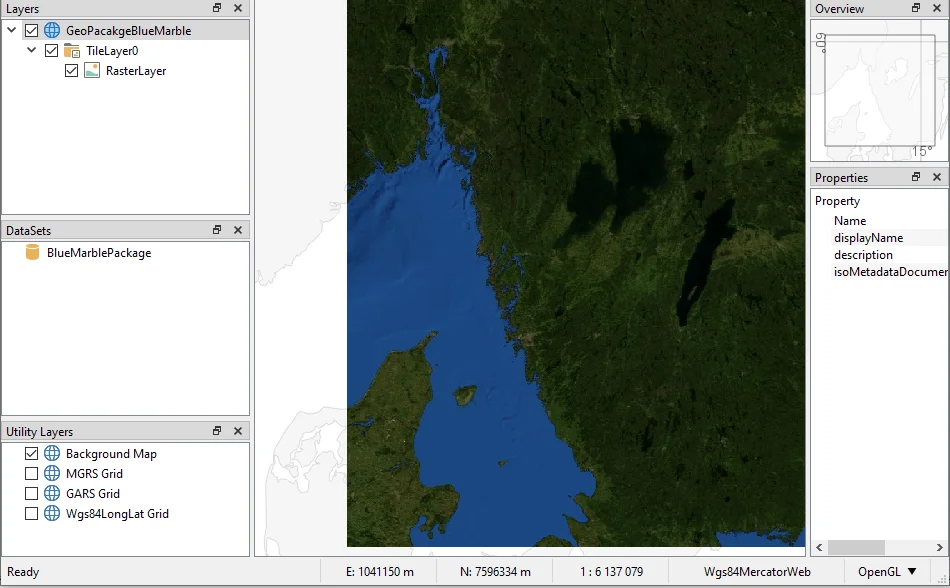
Make OGC GeoPackages in Carmenta Explorer
Guide on how to generate OGC GeoPackages using Carmenta Explorer. Step-by-step guide for developers working with geospatial data and open standards.
View Post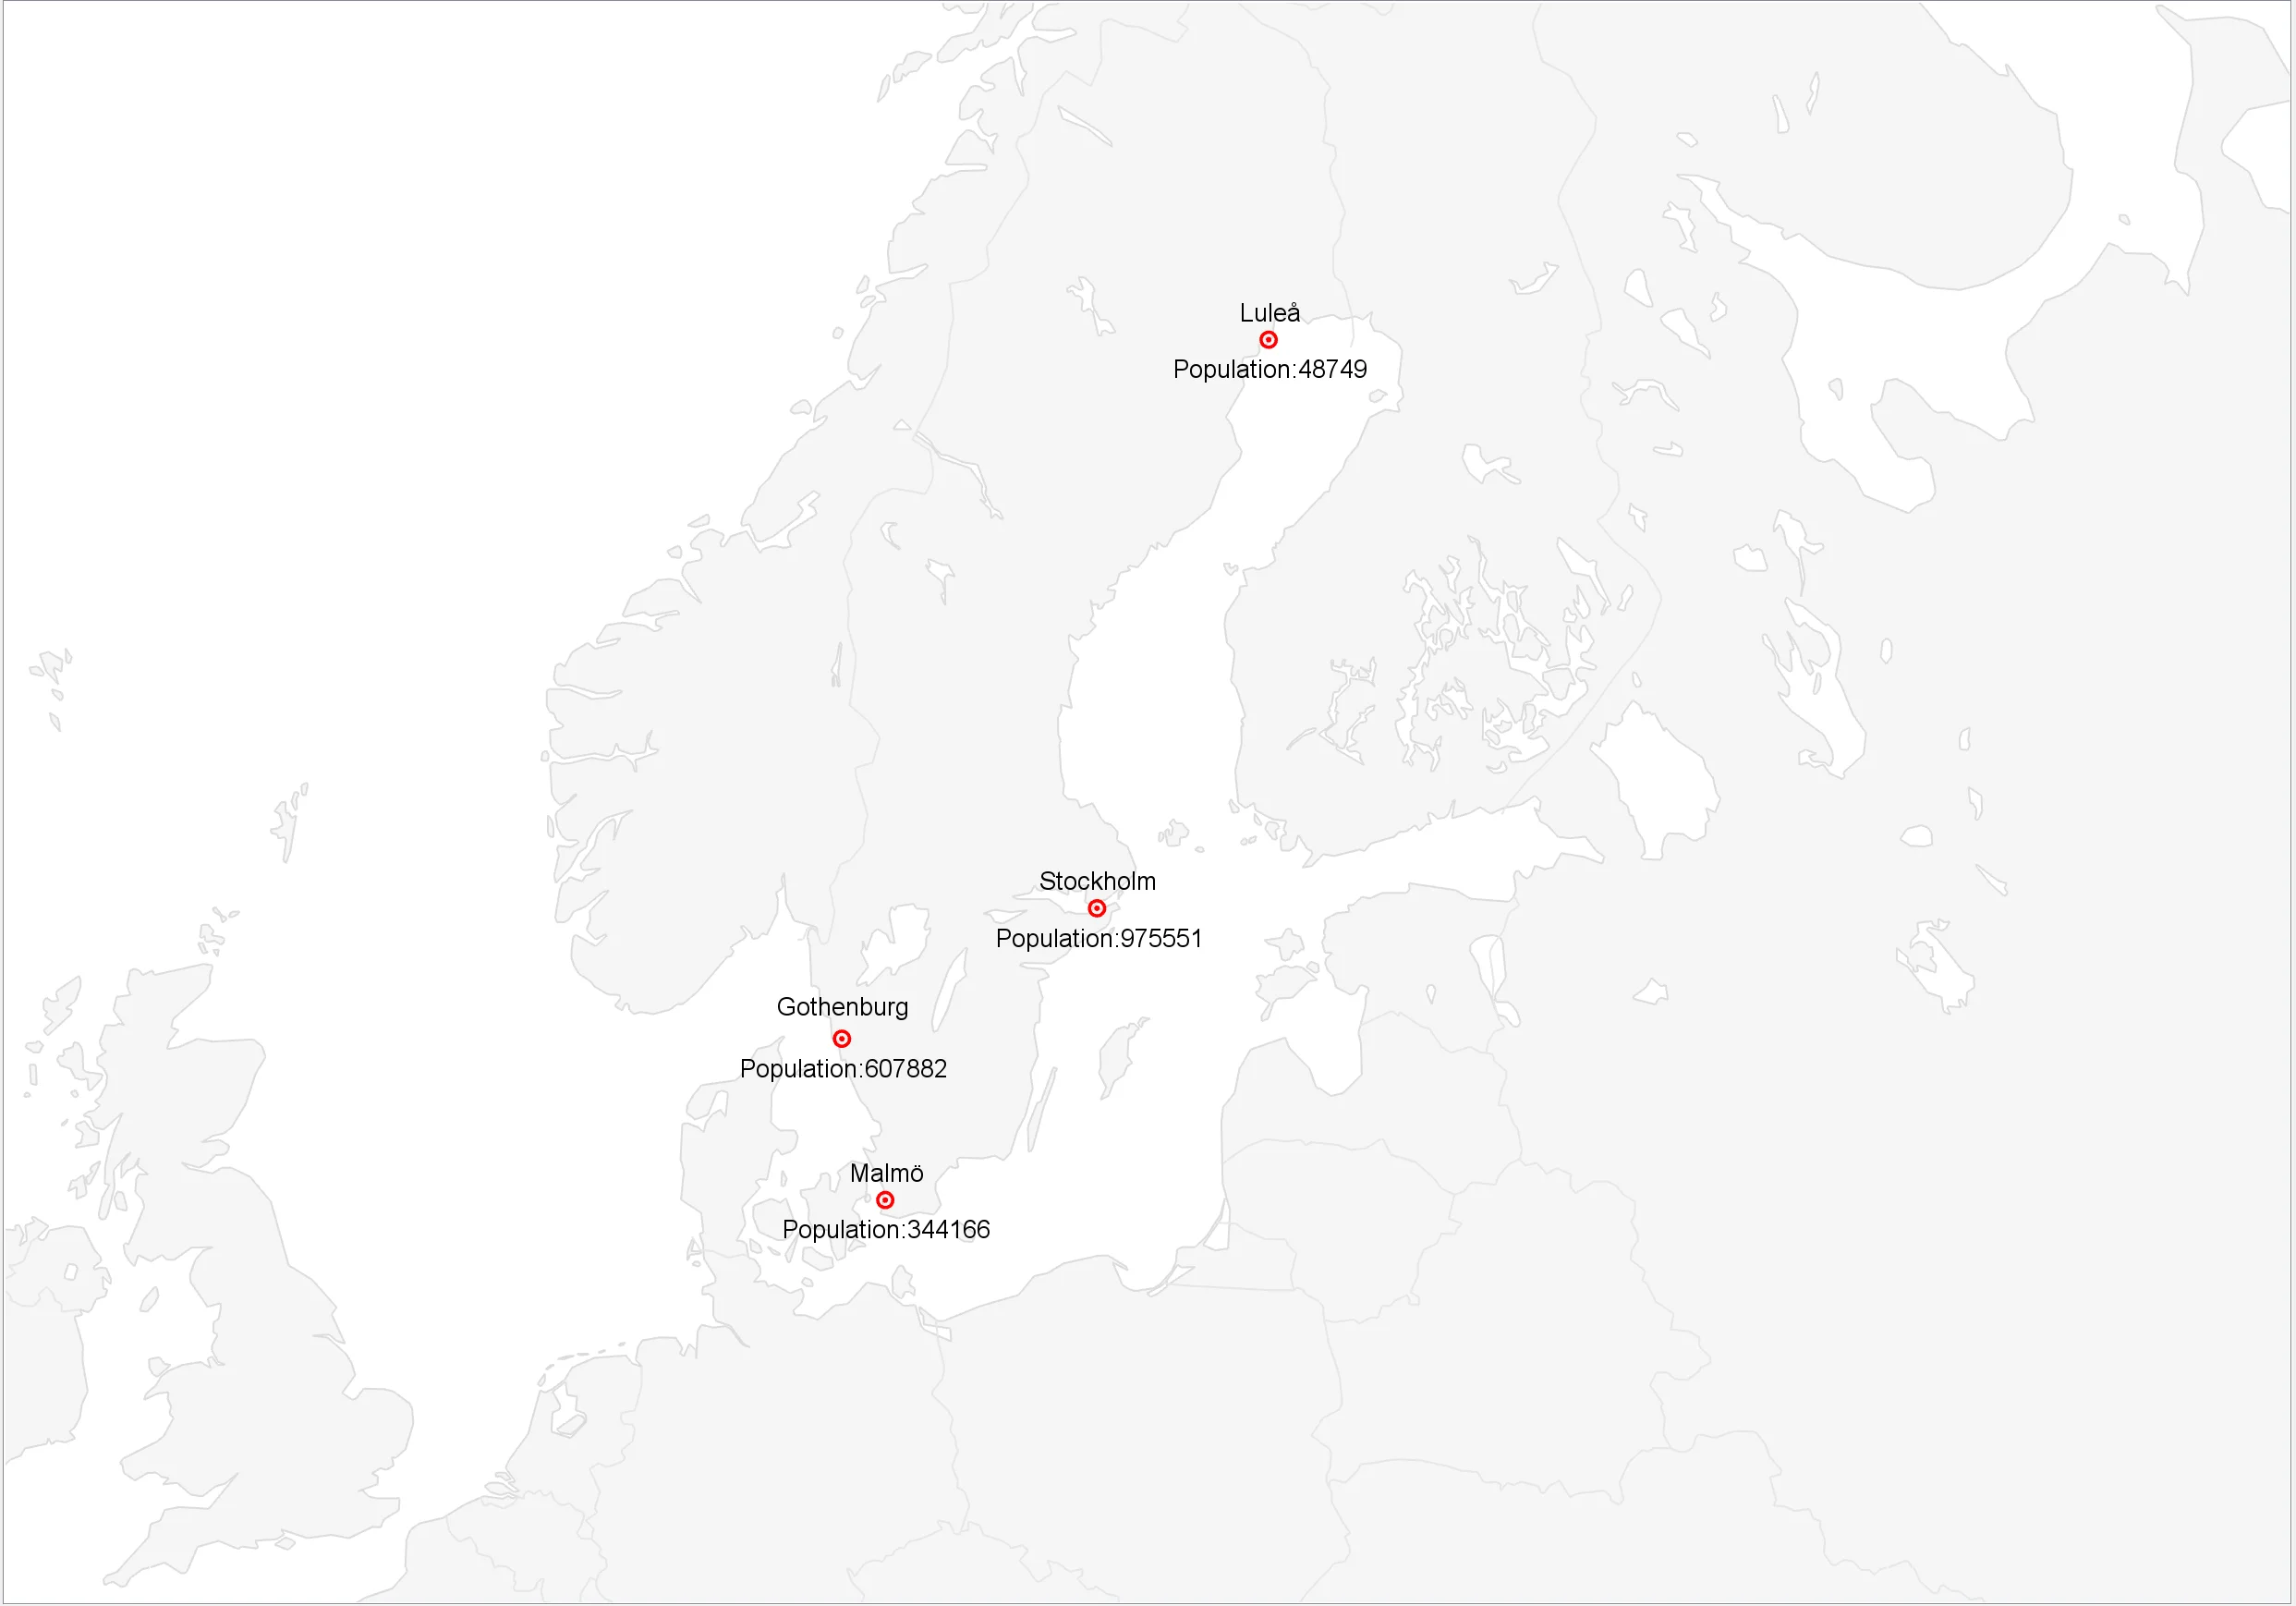
Carmenta Engine supports native reading of over 100 different data types. However, when developing a Carmenta Engine application, other types of data may be needed to complete the user experience. This article tackles three different types of data inputs:
This ZIP archive contains a solution that you can use to follow along as we go through how to achieve all three of these objectives.
We will have a look at a small WPF MVVM application (from the last article) that loads features directly into memory using a MemoryDataSet. The MemoryDataSet allows users to load features directly into memory either by using a custom tool or from code. In it, we generate features using randomized coordinates as well as using a Carmenta Engine CreateTool.
The overall WPF code, using the MVVM pattern, is based on the MVVM sample from the previous article. We will not have time to explain the overall application code, but will instead focus on the file AddAppDataViewModel.cs. This file handles the logic for inserting features directly into a MemoryDataSet, in two different ways which we will explore next.
public AddAppDataViewModel(IMapModel mapModel)
{
    _mapModel= mapModel;
    RandomFeatureClickEvent = new RelayCommand(RandomFeatureClickEventHandler);
    ActivateInsertToolEvent = new RelayCommand(ActivateInsertToolEventHandler);
    _appDataSet = _mapModel.View.FindChildObject("ApplicationDataSet") as MemoryDataSet;

   // ...
}
In this constructor, we set up commands for two different methods of adding application objects; one simulating some internal data source on a button press, the other allowing users to point and click on the map to add point objects. These commands are bound to buttons in the View, enabling users to invoke them.
Next, we extract the IMapModel the MemoryDataSet named ApplicationDataSet, which we will use to store application objects.
/// <summary>
/// We insert a random feature within 0 20 longitude 0 50 latitude
/// </summary>
private void RandomFeatureClickEventHandler()
{
    //randomize geolocation
    var rnd = new Random();
    var x = rnd.NextDouble() * 20.0;
    var y = rnd.NextDouble() * 50.0;

    var feature = new Feature(new PointGeometry(x, y), Crs.Wgs84LongLat);

    //insert feature into data set using a guard for thread saftey
    using (new Guard(_appDataSet))
    {
        _appDataSet.Insert(feature);
        _appDataSet.RefreshAllFeaturePresentation(true);
        _mapModel.View.Update();
    }
}
RandomFeatureClickEventHandler randomizes and inserts a new point feature into _appDataSet. A Guard must be used to ensure thread safety while manipulating the contents of the MemoryDataSet. We generate a set of stochastic coordinates in WGS84LonLat to create a PointGeometry. Each feature needs a geometry expressed using a CRS (Coordinate Reference System), for maximum performance we use the same CRS as is used on the MemoryDataSet.
Tip: When adding application data, it’s important to think of the performance. For each incoming data point that needs to be added, a multithreaded solution is recommended where the Guard handles thread related issues. In addition, use cacheMode=dynamic on the layer to enable caching, but remember to call the method RefreshFeaturePresentation on the MemoryDataSet to flush the cache whenever its contents change.
public AddAppDataViewModel(IMapModel mapModel)
{
    // ...

    _createTool = new CreateTool(_appDataSet);
    _createTool.CreateMode = ToolCreateMode.Point;
    _createTool.FeatureCreated += FeaturedCreatedEventHandler;
}

private void FeaturedCreatedEventHandler(object sender, FeatureCreatedEventArgs args)
{
    //Reset to the Standard Tool after you have created line feature.
    WeakReferenceMessenger.Default.Send(new ChangeToolRequest(new StandardTool()));
}

private void ActivateInsertToolEventHandler()
{
    //Change Tool
    WeakReferenceMessenger.Default.Send(new ChangeToolRequest(_createTool));

}
ActivateInsertToolEventHandler sends a request to change the current tool to AddAppDataiewModel’s Carmenta Engine Create Tool. The Create Tool needs to be told where to put the features it creates (in the form of a MemoryDataSet) as well as what feature creation mode to use. In this case, we select the mode to be Points.
Finally, we attach a handler to the CreateTool.FeatureCreatedEvent, an event raised whenever a new feature has been created and added to the MemoryDataSet. In this handler we can further modify the feature, if needed. In this case, we just switch back to the standard tool.
In this example we will handle the case where we have data in a format not natively supported by Carmenta Engine. We will solve this using a Carmenta Engine Custom Data Set, where we can read and load data from any type of file or other source. In this example, we have created a data.txt file consisting of 4 comma-separated data inputs. Each input carries a geo location in Wgs84LatLong, a name and a population count. They represent cities in Sweden.
57.708870,11.974560,Gothenburg,607882
59.334591,18.063240,Stockholm,975551
55.593821,13.007664,Malmö,344166
65.583012,22.159714,Luleå,48749
First, we setup our Carmenta Engine Configuration file, a.k.a PX file.
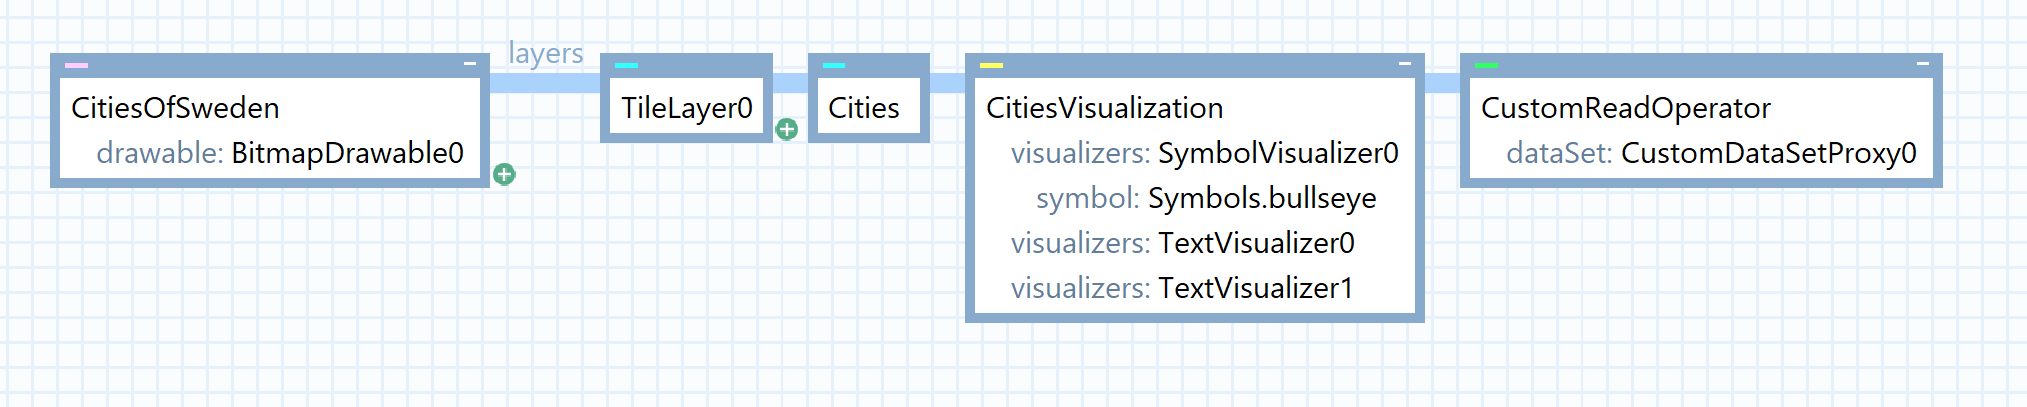
We have a very simplified setup, one layer consisting of the cities retrieved from the file read by our CustomDataSet. We visualize this layer using a symbol-visualizer combined with two text-visualizers, one for the name of the city and one for the population count.

To configure the CustomDataSetProxy to load our CustomDataSet, we set api to .NET, libraryName to the location of our CustomDataSet DLL file, and className to the full name of the CustomDataSet class (including namespaces). The paths are relative, when we have built the library, it will be located in the bin folder, hence the library name. Remember to build the customdataset before you run the PX file.
It is also possible to pass information from the CustomDataSetProxy using userProperties, in this case we supply the name of the data file using the attribute input. We can now easily change the data source by changing the value of this attribute, but keep in mind that the CustomDataSet can only read files in the specific format that we construct it to read.
Now we can open our CustomDataSetCSharp Visual Studio solution. If one does not wish to use Visual Studio, simply import the CsvDataSet.cs file into your preferred IDE and build using .NET framework 4. This solution is based on the CustomDataSet sample included in the Carmenta Engine SDK.
We have the class CsvDataSet (Comma-Separated Value Data Set) extend CustomDataSetAdapter, a build-in Engine class that gives us much of the plumbing needed to function as a CustomDataSet. To finish things off, there are a set of functions that need to be implemented:
We have also implemented the OnClone method that returns a new instance of the CsvDataSet.
/// <summary>
/// Overridden, initializes the dataset with point features from a text file.
/// </summary>
/// <param name="context">
/// Context object that provides access to the <b>CustomDataSetProxy</b>.
/// </param>
public override void OnInitialize(CustomDataSetContext context)
{
    // If this CsvDataSet did not get a file path on construction,
    // try to get it from CustomDataSetProxy.userProperties.
    if (fileName.Length == 0)
    {
        if (context.UserProperties.TryGetValue("input", out AttributeValue file) && file.Type == AttributeType.String)
        {
            // Loads the text file specified by the fileName attribute in CustomDataSetProxy.userPropterties
            fileName = (string)file.Value;
        }
        else
        {
            // Loads point.txt if another file has not been specified in CustomDataSetProxy.userPropterties
            fileName = "data.txt";
        }

        if (path.Length == 0)
        {
            path = context.ConfigurationPath;
        }
    }

    string fullPath = path.Length > 0 ? path + Path.DirectorySeparatorChar + fileName : fileName;
    Load(fullPath);
}
OnInitialize tries to get the userProperty input and parse it as a string. If it was parsed correctly, this is used to find the data file. If not, we hardcode the path to "data.txt". Then we call the Load method that loads the data file. For each line in the file we attempt to generate a feature with the method LoadFeature.
private void LoadFeature(string s)
{
    // Split the string into separate values
    string[] strs = s.Split(',');

    if (strs.Length == 4)
    {
        // Parse the longitude and latitude, skip this entry if we fail to parse the coordinates
        if (double.TryParse(strs[1], NumberStyles.Any, CultureInfo.InvariantCulture.NumberFormat, out double x) &&
            double.TryParse(strs[0], NumberStyles.Any, CultureInfo.InvariantCulture.NumberFormat, out double y))
        {
            // Create a unique id for the new feature
            ulong objectId = (ulong)features.Count;

            // Create the feature at the specified coordinates
            Feature feature = new Feature(
                new PointGeometry(x, y),
                Crs.Wgs84LongLat,
                new Id(0, objectId));

            // Set the name & population of the feature
            feature.Attributes["NAME"] = strs[2];
            feature.Attributes["POPULATION"] = double.Parse(strs[3]);

            // Save the feature in the dataset
            features[objectId] = feature;

            // Update the bounding rectangle that contains all features in the dataset
            bounds = features.Count == 1
                ? feature.CalculateBounds()
                : new Rectangle(
                    Math.Min(bounds.XMin, x),
                    Math.Min(bounds.YMin, y),
                    Math.Max(bounds.XMax, x),
                    Math.Max(bounds.YMax, y));
        }
    }
}
The LoadFeature method is where the magic happens as lines of CSV are converted into Carmenta Features. First, we split each string on commas. Second, we parse each value in the appropriate way: lat, lon, name, population. Store lonlat values as a new point geometry, name as string and population as a double. The feature is created in Crs.Wgs84LongLat, we set the CsvDataSet to also use this CRS in its constructor. Each feature gets assigned a unique id value, here we simply count the number of features and set the id to the current total. Lastly, we create a bounding area for our features.
The OnGetFeature method tries to locate the feature in the data set and if it’s found we return it. OnCalculateBounds returns the bounds calculated when we loaded the features into memory. The OnQuery method checks if the feature is within the view area or if the feature matches the query condition. (Currently we have no query on our CustomDataSetProxy.) If a feature is within the area and matches the query, we add the feature to the result.
public override CustomDataSetResult OnQuery(Rectangle area, Query query, ViewInfo info)
{
    // Create a result object
    CustomDataSetResult result = new CustomDataSetResult();

    // Iterate through all features in the data set
    foreach (KeyValuePair<ulong, Feature> obj in features)
    {
        Feature feature = obj.Value;

        // Skip this feature if its bounds does not overlap the specified area
        if (!feature.CalculateBounds().Overlap(area))
        {
            continue;
        }

        // Skip this feature if a query has been specified that does not match the feature
        if (query != null && !query.Match(feature))
        {
            continue;
        }

        // The feature is inside the specified area and matches the query so return it
        result.Add(feature);
    }

    // Return the result
    return result;
}
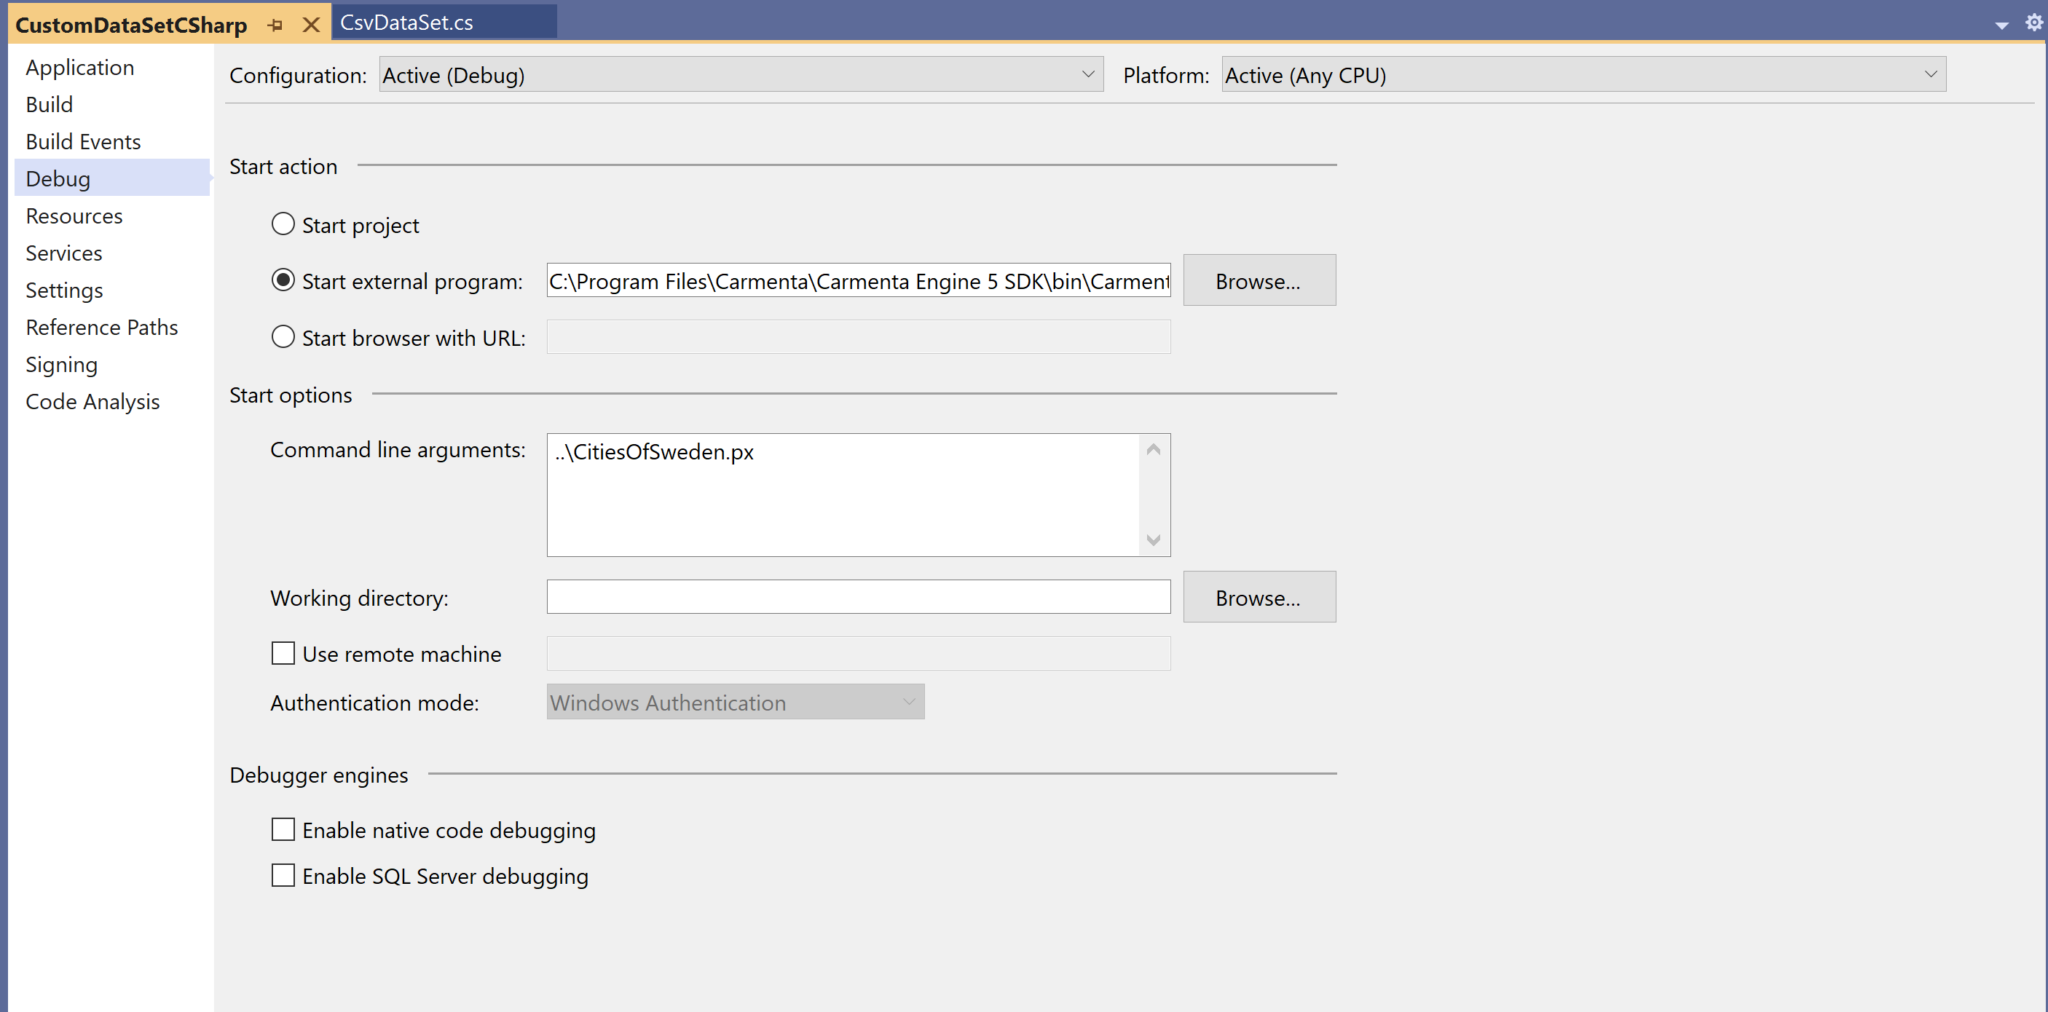
Now we can build the DLL which will then end up in the bin folder. We can also build and start the PX file directly from Visual Studio. This way, we can debug the data set code live and see how each feature is parsed from a line in the data file. To do this, open the project properties view. On the Debug tab to the left, select “Start external program” and select Carmenta Explorer from your Carmenta Engine SDK installation folder. Inside the start options, write the relative path to the PX file. Remember, the bin folder is the location of the build, so in our case the start option should say "..\CitiesOfSweden.px".
In the zipped solution, this has already been done.

To summarize:
Keep in mind, the data set’s reference system must be same as the features’ reference system. Also make sure to parse the information in the correct way, using geometries, raster, boundaries, and attributes, being esepcially mindful of coordinate order (Carmenta Engine Features should always be defined using Easting-Northing coordinate order, i.e. horizontal coordinate first). Another key point is efficiency, make sure not to read too much data. If you must, try to use queries to limit the total amount of data that must be put into memory.
In this final example we wish to fetch data from a PostGIS database. Carmenta does not host a public database for demo purposes, if you wish to follow along you need to change the database specific inputs to match your own database. For more detailed information and prerequisites, see the PostgreSqlDataSet article in the Carmenta Engine SDK Documentation.
Note: Other database types work in similar ways, so if you already have a spatial database of any other supported kind, feel free to substitute the corresponding DatabaseDataSet type in the following steps.
Everything related to database inputs are handled by a DatabaseDataSet (abstract class), Carmenta Engine supports 4 types of databases:
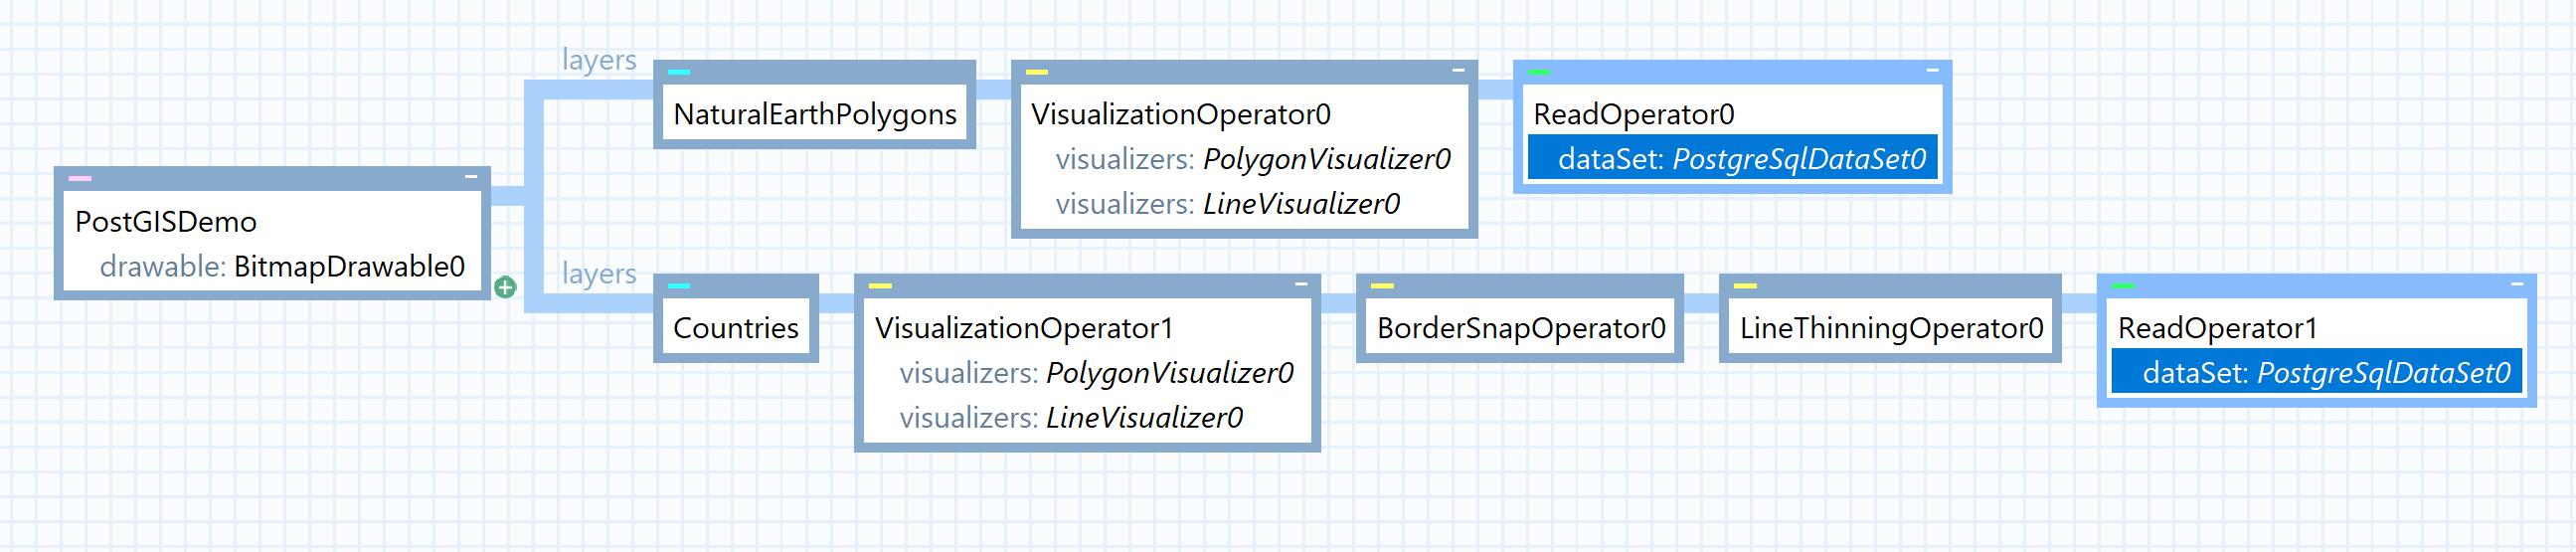
In this example we will use a PostgreSqlDataSet (PostGIS). To connect your database to Carmenta Engine, create a ReadOperator and add a PostGreSqlDataSet.
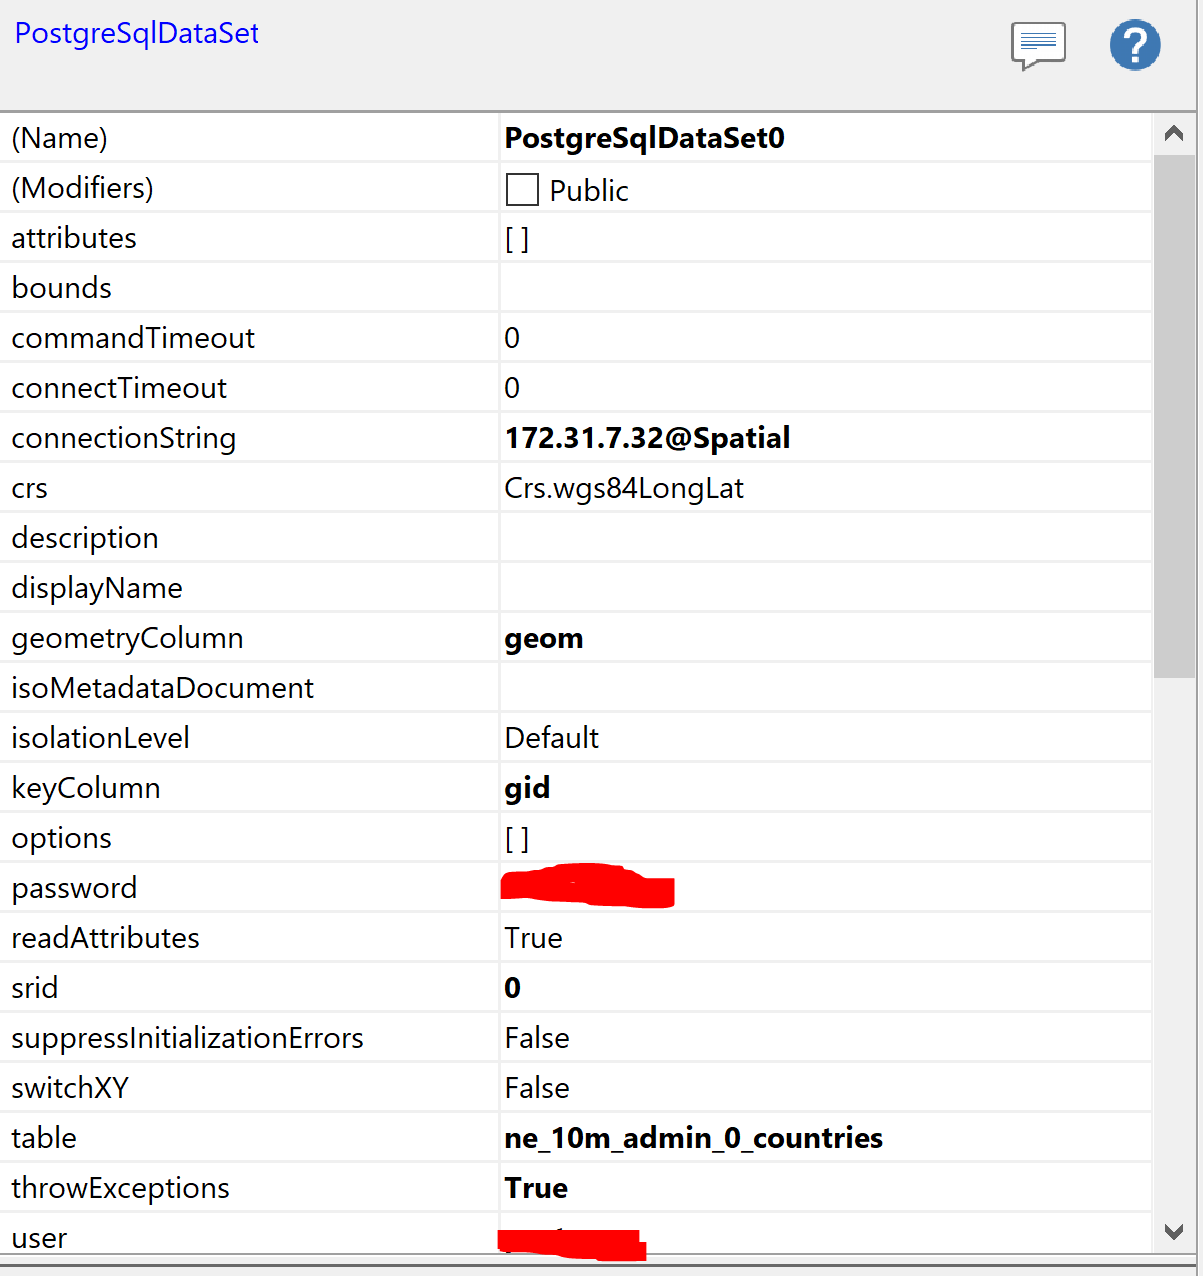
There are certain properties that need to be set. connectString should be written as "server_name@database_name". Then we need to set keyColumn, table, srid and geometryColumn. Make sure that the values match the ones in your database. Finally, we need to login to the database, we do this by supplying the user id and password as parameters. Additionally, we can have the data set throw exceptions on database errors by setting the throwExceptions property to true.
Now if you start the configuration in Carmenta Explorer you should be able to see the data presented if all the settings are correct. Remember that data fetched from a server can be retrieved from the data set by calling i.e the method GetFeature(id) if one wishes to further modify the data from code. Alternatively, one can create a Carmenta Engine Custom Operator to modify the incoming data.
In this article, we have seen three different ways of adding application data to your Carmenta Engine application.
If we have data stored in a format not recognized by Carmenta, create a CustomDataSet to read the data directly into memory.
If we have data based on user activity input, we can load application data into memory using the MemoryDataSet and possibly using CreateTool.
Lastly, if we have data in a supported spatial database table, we can retrieve it using a DatabaseDataSet if we supply the correct connection string, parameters and user identification data.
Guide on how to generate OGC GeoPackages using Carmenta Explorer. Step-by-step guide for developers working with geospatial data and open standards.
View Post
Explore how to apply the MVVM pattern in Carmenta Engine WPF apps. This guide walks through refactoring a sample project for better structure and maintainability.
View Post